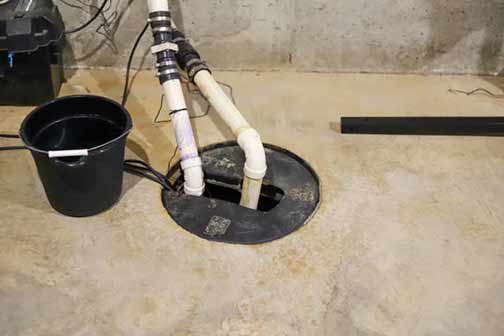
Your sump pump plays a crucial role in keeping your basement or crawl space dry by preventing water accumulation. However, if your sump pump starts leaking, it can lead to a variety of issues, including water damage and mold growth. Below we will explore some effective methods to stop your sump pump from leaking and ensure the continued protection of your home.
The Common Causes of Sump Pump Leaks
Before we get into the solutions, it is important to understand the common causes of sump pump leaks. By identifying the root cause, you can take appropriate steps to address the issue effectively. Here are some of the most prevalent causes:
- Worn Out Seals: Over time, the seals within the sump pump can deteriorate, leading to leaks.
- Improper Installation: If the sump pump is not installed correctly, it may not function optimally and can result in leaks.
- Cracked Pump Housing: A crack in the pump housing can cause water to leak out.
- Frozen Discharge Pipe: During the colder months, the discharge pipe can freeze, causing water to back up and leak from the sump pump.
- Overwhelmed Pump: If your sump pump is undersized or unable to handle excessive water volume, it can become overwhelmed and start leaking.
Steps to Stop Your Sump Pump from Leaking
Now that we understand the common causes of sump pump leaks, let’s explore some steps you can take to stop the leaks and maintain the functionality of your sump pump:
Inspect and Replace Worn Out Seals
Over time, the seals in your sump pump can deteriorate due to wear and tear. Inspect the seals regularly and look for any signs of cracks or damage. If you notice any issues, replace the worn out seals with new ones. This simple step can prevent water from leaking out of the pump.
Check the Installation
If your sump pump was not installed properly, it may not operate efficiently, leading to leaks. Ensure that the pump is correctly positioned and securely fastened. Additionally, check the discharge pipe for any obstructions or improper connections. Proper installation is key to preventing leaks.
Repair or Replace a Cracked Pump Housing
If you discover a crack in the pump housing, it is crucial to address it promptly. Small cracks can often be repaired using waterproof sealants or epoxy. However, if the crack is extensive or the pump housing is severely damaged, it may be necessary to replace the entire pump. Contact a professional if you are unsure about the best course of action.
Insulate the Discharge Pipe
To prevent the discharge pipe from freezing during colder months, consider insulating it. Insulation sleeves or wraps designed specifically for sump pump discharge pipes are readily available in hardware stores. By insulating the pipe, you can avoid water backup and subsequent leaks.
Upgrade to a Higher Capacity Pump
If your sump pump is consistently overwhelmed by the volume of water it needs to handle, upgrading to a higher capacity pump may be necessary. A larger pump will effectively manage the water flow, reducing the risk of leaks. Contact a professional plumber to determine the appropriate pump size based on your specific needs.
Conduct Regular Maintenance
Prevention is always better than cure, and this applies to sump pump maintenance as well. Regularly inspect and test your sump pump to ensure it is functioning properly. Clean out any debris or sediment that may accumulate in the pump or pit. Additionally, consider a backup battery sump pump installation to ensure your sump pump continues to operate during power outages.
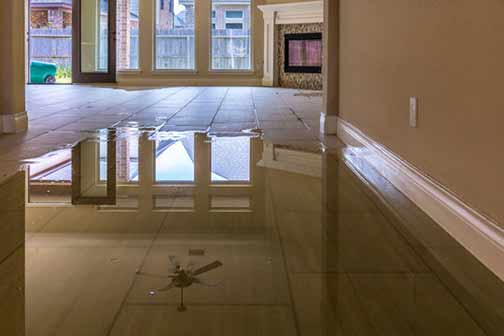
It is important to address water damage promptly to prevent further issues, such as structural damage or mold growth.
Detecting and Addressing Water Damage
If your sump pump has been leaking for an extended period, it is possible that you may have already experienced some water damage. It is important to address water damage promptly to prevent further issues, such as structural damage or mold growth. Here are some steps to detect and address water damage:
Look for Visible Signs
Inspect your basement or crawl space for any visible signs of water damage. Look out for damp or discolored walls, peeling paint, or a musty odor, as these can indicate the presence of water intrusion.
Check for Mold Growth
Mold thrives in moist environments, so a leaking sump pump can create the perfect breeding ground. Inspect areas around the sump pump for any mold growth and address it promptly.
Dry Out the Affected Area
If you discover any water damage, use dehumidifiers and fans to dry out the affected area. Remove any wet materials, such as carpets or furniture, to prevent further damage and mold growth.
Speak With a Professional
If the water damage is extensive or you are unsure about the best course of action, it is advisable to contact professional basement flooding services. They have the expertise and equipment to assess the situation and recommend appropriate repairs.
A leaking sump pump can be a source of frustration and potential damage to your home. By understanding the common causes of sump pump leaks and following the steps outlined in this guide, you can effectively address the issue and prevent future leaks. Remember to conduct regular maintenance to ensure the continued functionality of your sump pump and promptly address any water damage that may occur. By taking these proactive measures, you can keep your basement or crawl space dry and protected.