Tag Archives: importance of spring sump pump maintenance

Spring Cleaning for Your Sump Pump: Inspecting and Maintaining Your System

Spring Cleaning for Your Sump Pump

As the winter snow melts and the spring rains begin to fall, it’s important to ensure that your sump pump is in good working condition to protect your basement from flooding. Here we will cover the key steps and tips to keep your sump pump functioning optimally.

Why Spring Cleaning for Your Sump Pump is Essential

Spring is the ideal time to inspect and maintain your sump pump system for several reasons. The increased rainfall during this season can put your basement at a higher risk of flooding. By ensuring that your sump pump is in good condition, you can avoid costly water damage and prevent potential health hazards such as mold growth.

The Importance of Regular Inspections

An essential part of maintaining your sump pump system is conducting regular inspections. Here are a few reasons why regular inspections are important:

  • Identify and address any potential issues early on.
  • Ensure that all components are functioning correctly.
  • Prolong the lifespan of your sump pump.

Regular inspections will help you catch any problems before they escalate into significant issues, saving you time, money, and stress in the long run.

Step-by-Step Guide to Inspecting and Maintaining Your Sump Pump

Step 1: Safety First

Before you begin inspecting and maintaining your sump pump, it’s important to prioritize safety. Make sure to follow these safety guidelines:

  • Disconnect the sump pump from its power source to avoid accidental electrical shocks.
  • Wear protective gloves to avoid any potential bacteria or contaminants.

Step 2: Exterior Inspection

Start by performing an exterior inspection of your sump pump system. Here’s what you should check:

  • Inspect the discharge pipe for any clogs or obstructions.
  • Ensure that the pipe is securely connected and directed away from your foundation.
  • Check the vent hole on the discharge pipe for any blockages.

Step 3: Interior Inspection

Once you’ve completed the exterior inspection, move on to the interior inspection. Follow these steps:

  • Remove the sump pump cover to access the pit.
  • Inspect the pit for any debris or sediment buildup.
  • Check the float switch to ensure it moves freely and isn’t obstructed.
  • Verify that the check valve is working correctly and allowing water to flow in one direction.
  • Clean or replace the sump pump if necessary, following the manufacturer’s instructions.

Step 4: Test the Sump Pump

After completing the inspections, it’s time to test your sump pump system. Here’s how:

  • Pour a bucket of water into the sump pit to activate the pump.
  • Observe the pump’s operation, ensuring that it starts promptly and efficiently removes the water.
  • Listen for any unusual noises or vibrations that may indicate a problem.

Step 5: Consider a Backup Sump Pump System

To provide additional protection against basement flooding, consider installing a backup sump pump system. These systems are designed to support your primary pump in case of power outages or mechanical failures. Options include battery-powered pumps, water-powered pumps, or generator-powered pumps.
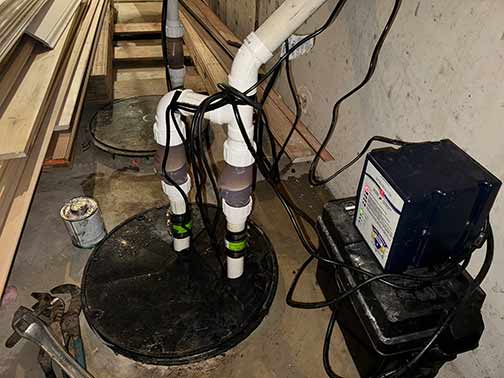
a sump pump backup system in place.

To provide additional protection against basement flooding, consider installing a backup sump pump system.

Tips for Maintaining Your Sump Pump System

While spring is an excellent time to thoroughly inspect your sump pump system, regular maintenance throughout the year will help keep it in optimal condition. Here are some additional tips:

  • Test your sump pump system every few months by pouring water into the pit.
  • Ensure that the float switch moves freely and isn’t obstructed.
  • Check the power cord and plug for any signs of damage.
  • Keep the pit clear of debris and sediment.
  • Consider installing a sump pump alarm to alert you in case of pump failure or high water levels.
  • Know the location of your main water shut-off valve in case of emergencies.
  • Follow the manufacturer’s maintenance recommendations.

Spring cleaning for your sump pump is an essential task to protect your basement from potential flooding. By following the steps outlined in this article and conducting regular inspections and maintenance, you can ensure that your sump pump system operates efficiently and effectively. Remember to prioritize safety, and if you encounter any issues beyond your expertise, don’t hesitate to contact a professional plumber for assistance. With proper care, your sump pump will continue to safeguard your home for years to come.

Tips for Making Sure your Sump Pump is Ready in the Spring

Tips For Making Sure Your Sump Pump Is Ready In The Spring

The spring rains are coming; fields will flourish, flowers will bloom, and all the little birds will find a reason to sing. Our days will get longer, the weather will warm up, and the season of renewal will bring us all-around cheerfulness.

Springtime is when nature comes alive, yet springtime can also be a season of tears. That’s because as the snow melts and it starts to rain, something else also begins. Heavy rains become heavy floods that can cause serious damage to homes, warns East Bay Management.

But if you have a sump pump in your home, you do not need to worry about springtime floods, do you? Whether your sump pump is in the basement, crawlspace, or backyard, it should be able to protect your home from flooding, right? Sadly, this is only sometimes the case.

Your home can still get flooded even when you have a sump pump. Remember that your sump pump has been frozen through winter and might not just be ready for spring. To protect your home, you should take these steps to ensure your sump pump is ready for spring.

Tips for getting your sump pump ready for spring

In the winter, there isn’t much water flowing into your sump basin, and the sump pump won’t have anything to do throughout the season. In that time, however, many things can go wrong with the sump pump, but you will not know it until your basement becomes flooded.

To keep this from happening, do these:

Check the power

There are two kinds of electrical connections you will find on sump pumps. Some sump pumps have two electrical cords: a float cord and a sump cord. The sump cord plugs into the back of the float cord plug. To test a sump pump with two plugs, follow these steps:

Unplug both cords and plug the pump cord into the wall outlet. When you turn the power on, you should hear your pump activate (it will make a humming sound). If this happens, the electrical connections are fine; connect the two cords back as they were.

If your sump pump has only one cord, inspect it for signs of damage and do step two below to ensure the electrical connections are okay. Remember to secure the sump pump cords with tape or zip ties to keep them from getting tangled with the float.

Check the float system

Whether the sump pump float is a flappy ball that swings out as the water rises or a single pull float that goes up and down, they both operate on the same principle. The float should automatically kick-start the motor as the water level in the basin rises.

If the float is stuck, your sump pump will not activate when the basin fills with water (even if the motor is in good condition). You can test the float by pouring a few gallons of water into the basin until the water is high enough for the float to activate the pump.

After the pump powers on, wait till the pit is emptied, and the motor turns off; repeat the process. If the sump pump fails to activate, you may have a bad switch, the float could be stuck, the pump might not get power, or the motor is faulty. In some cases a replacement of the sump pump may be your only option.

Test the check valve

The check valve may be positioned inside the pit or on the wall. Its location doesn’t matter if it performs its function. The check valve keeps water being pumped out of the pit from flowing back into the pump and running the impeller backward.

To test the check valve, pour water into the sump pit once again until the pump powers up. Wait until the water is removed from the pit and the motor switches off. Now listen to see if you can hear water flowing inside the pipe. If it is, your check valve needs to be fixed.

A faulty rubber seat often causes a bad check valve. The problem can be solved by replacing the check valve. Check valves are easy to replace; anyone could do it. But if you need help with how to do this, it is best to contact a plumber.

Clean the sump basin and inlet screen

Some mud and debris may be at the bottom of the sump basin. You want to clear these away to reduce the chances of your sump pump getting jammed. Clean the basin by scooping out the dirt with a scooper.

If the inlet screen of your sump pump is blocked with debris, it will impair the pump’s efficiency. To clean the inlet screen, gently remove it from the pump and rinse it in water until it is clean. Replace it as carefully as you removed it.