Tag Archives: how to maintain a water heater

Keep Your Water Heater Running Smoothly with Routine Draining

Keep Your Water Heater Running Smoothly with Routine Draining

A working water heater is one of the most indispensable appliances for the smooth running of your home. Water heaters make everyday activities like doing the laundry, washing dishes and taking a shower easier or even fun, says Nelson Management.

However, like other essential systems in the homes, most homeowners ignore their water heater until it malfunctions. Only when they turn a hot water faucet and get a blast of cold water do they attend to their water heater?

Yet water heaters are not hard to maintain; all you need is a good understanding of a few simple steps and a fixed schedule. If you do these two things, your water heater will serve you well and exceed its projected lifespan.

In this post, we discuss the most essential maintenance step for the smooth operation of a storage water heater. To get the full value from your water heater, you should drain it periodically. How do you drain a water heater?

Draining your water heater

This maintenance step helps remove crud or mineral deposits that have settled at the bottom of the water heater tank. It improves the appliance’s performance and prolongs its life. Draining a water heater is easy. Here is how to do it.

How to drain and flush a water heater

Required tools: Garden hose, bucket or drain and screwdriver

Cut the power or gas supply

Before doing any maintenance work on your water heater, always ensure the power or gas supply is off.

Let the water cool

To avoid burns, you may want to wait until the water inside the tank has cooled. This step is optional, but you must take proper care not to get burned.

Connect garden hose

Look for the drain valve and connect a garden hose to it. The valve will be near the bottom of the water heater tank. Connect the other end of the hose to a bucket, flood drain or sump basin.

Close the cold water supply

You will see two water lines connected to the water heater. The cold water line should say “cold” or “in.” If it doesn’t, you may need to track the lines to see which goes to the water meter or pressure tank. That is the cold water supply; close it.

Open the TPR Valve

The TPR (temperature and pressure relief) valve can be found on the side of the tank, towards its top. Lift the flap to open the valve. That will allow air into the tank as water flows out of it. You may also open a hot water faucet on a floor above your water heater.

Open the drain valve

Open the drain valve at the bottom with the garden hose attached. If the water is still hot, avoid putting your hand or foot into it. Keep small children and pets out of the area. When the water stops flowing, the tank is empty.

Flush the water heater

Open the cold water supply with the drain valve still open. Cold water will flow into and out of the tank under pressure. This additional step ensures that any debris left inside the tank will be washed out. 

Repeat step 7

Close the drain valve and leave the cold water supply open until the tank is full. Open the drain valve and let the water flow out. That will ensure that the tank is clean.

Refill the tank

Close the drain valve and let cold water refill the tank.

Restore power or gas supply

Do not forget to reconnect your water heater to power or relight the gas. After this, wait until the water is heated to the desired temperature to ensure the water heater works.

How long does this process take, and how often should you do it?

On average, it should not take more than 30 minutes to drain a 50-gallon water heater. The actual amount of time it takes to drain your water heater will vary depending on:

  • Your home’s water pressure.
  • The amount of sediment inside the tank. If you have never drained the water heater, expect it to take longer.
  • How handy you are. A professional plumber will do it in less time than a homeowner.

How often you drain your water heater depends on the quality of the water entering your home. If your area’s water is hard or has a lot of sediments, you may have to do this step every six months. Otherwise, once a year is sufficient. A reputable plumber can help you make the right decision.
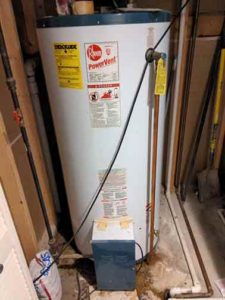
How to Maintain an Older Water Heater

How to Maintain an Older Water HeaterOld household appliances are more susceptible to breakdowns than new ones; all the years of use start to take their toll. The wear and tear on your equipment often mean you can’t get as much work from an old appliance as you can from a new one. Usually, the only way to deal with this loss of reliability is to replace the old water heater tank with a new one.

Along with your refrigerator, the water heater is one of the most used appliances in your home. Water heaters are indispensable for making simple things like taking a shower or washing dishes convenient. Without a reliable source of hot water in the house, it would be almost impossible to live in it. Water heater malfunctions are therefore one of the most distressing issues in the home.

Since an older water heater can mean more home maintenance issues, how can you reduce incidences of breakdowns with the older water heater in your home?

There are only two ways to deal with that old appliance. You can replace it with a new one or look for ways to extend its life. Is there any way to keep getting value out of your water heater even when it is old? The answer is yes. All water heaters have their expected lifespan, but you can extend the equipment’s life through proper maintenance, says Rollingwood Management Inc.

The steps for prolonging the life of a water heater are easy to do and affordable. They do not require special knowledge, and you can do them with the tools you already have in your home. All that is needed is to be timely in applying the steps and enlist the help of an expert when it is necessary. Here are the steps to keep your old water heater running smoothly.

Six steps for maintaining an older water heater

Test the TPR Valve

The TPR valve (temperature & pressure relief valve) keeps the water heater safe. It releases water and pressure if these get too high inside the tank. If the thermostat inside your appliance fails and the temperature gets too high, the valve lets the excess steam escape to prevent an explosion. The TPR valve should be tested twice a year by simply carrying it up and down several times. A gurgling sound should follow this action as water flows into the drain tube.

Insulate the pipes

By reducing the rate of condensation, insulated hot water pipes cut heat loss by as much as 45% and reduce your heating costs by 9% or more. To insulate the pipes, you need self-sticking 3/8-inch foam pipe insulation. The foam should match the diameter of your pipes. Slide the foam over the hot/cold water pipes as far as it will go. Then squeeze the end of the foam and tape it. Ensure at least 6 inches of space between the insulated pipe and the flue.

water-heater-insulation

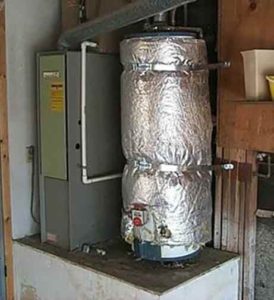
Insulate the water heater tank

Insulating your water heater will improve its efficiency, reduce heat loss and shave dollars off your heating bill. Insulating the water heater is as simple as wrapping the tank with an insulating blanket. Buy an insulating blanket that matches the size of your water heater tank. Turn the power off on the appliance and wrap the blanket tightly around the tank. Cut off those parts of the blanket that cover the valves and panels. Turn the power back on.

Setting the temperature

The optimal temperature setting for your water heater will let you maximize the appliance and prolong your water heater’s life. For the best results, set the temperature between 130F° and 140F°. Higher temperature settings can result in burns. Lower settings may encourage bacteria to grow inside the tank. To set the temperature, look for the temperature dial on the side of the tank. Unscrew the cover. Using a flathead screwdriver, adjust the dial to the required settings.

Flush the tank

All the mineral content and particles in the water entering your water heater can end up inside the tank. As the water gets heated and evaporates, it leaves sediments that can impair the performance of your appliance. Sediments also increase the risk of rust and explosions. To get rid of deposits, you should flush the water heater tank twice a year. That is as simple as opening the drain cock and cold water supply valve. Let the water run for five minutes or until all sediment at the bottom of the tank washes out.

Check the anode rod

The anode rod protects your water heater from corrosion. It is the first thing the chemicals inside the water entering your home will attack. That is why the anode rod in your water heater gets eaten up. Without the anode rod, the corrosive elements in water will start attacking your water heater. Replacing the anode rod can save you the cost of buying a new water heater. Inspect the rod every year to ensure it is still in good shape.