Category Archives: water heater leaks

What to Do When Your Water Heater is Leaking from the Top: A Step-by-Step Guide

water heater is leaking from the top`

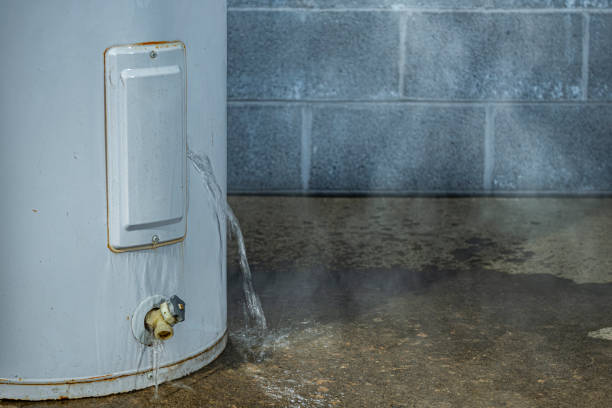
Discovering a leak in your water heater can be a cause for concern, but don’t panic. Below we will provide you with clear and concise instructions to help you address the issue and potentially prevent further damage. Whether you are a seasoned DIY enthusiast or a first time homeowner, our guide is designed to assist you in resolving this common household problem.

Understanding the Problem

Before we get into into the steps, let’s take a moment to understand why your water heater may be leaking from the top. The top of a water heater is typically the location where the hot water exit pipe and the cold water inlet pipe are connected to the unit. A leak in this area can indicate a few potential issues:

  1. Pressure Relief Valve: The pressure relief valve may be malfunctioning or experiencing excess pressure, causing it to leak.
  2. Temperature and Pressure Relief Valve: The temperature and pressure relief valve (T&P valve) could be releasing water due to high temperatures or pressure within the water heater.
  3. Loose Connections: The connections between pipes and the top of the water heater may have become loose over time, resulting in a leak.
  4. Corrosion: Corrosion can weaken the top of the water heater, leading to leaks.

Step 1: Turn off the Power

The first step when dealing with any issue related to your water heater is to turn off the power supply. This is crucial for your safety and to prevent any potential accidents. Locate the circuit breaker or switch that controls the electricity to the water heater and switch it off. If your water heater is gas-powered, turn off the gas supply.

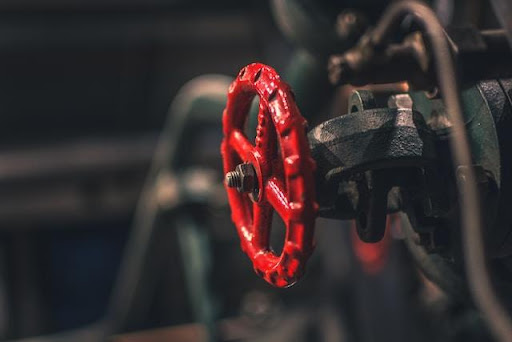
Step 2: Shut off the Cold Water Supply

Once the power is turned off, locate the cold water supply valve connected to your water heater. This valve should be located on the top or side of the unit. Turn the valve clockwise (to the right) to shut off the water supply.

Step 3: Release Pressure From the Temperature and Pressure Relief Valve

The next step is to relieve the pressure from the temperature and pressure relief valve (T&P valve). This valve is usually located on the side or top of the water heater. Place a bucket or a container beneath the T&P valve to catch any water that may be released. Carefully lift the valve’s lever to open it and allow the pressure to release. If water flows out continuously or doesn’t stop after releasing the lever, it is advisable to contact a professional plumber.

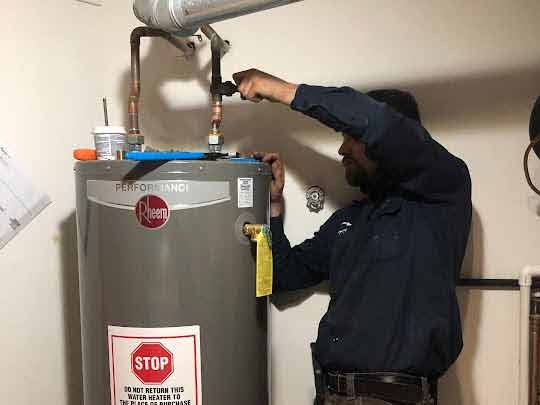
Step 4: Inspect and Tighten Loose Connections

After relieving the pressure, inspect the connections at the top of your water heater. Check for any visible signs of leaks and make sure all connections are secure. If you notice any loose connections, use a wrench or pliers to tighten them. Be cautious not to overtighten, as it may lead to further damage or leaks.

Step 5: Check the Pressure Relief Valve

If you suspect that the pressure relief valve is the source of the leak, it may need to be replaced. However, before replacing it, it is worth testing it to ensure it is functioning correctly. Consult your water heater’s manual for instructions specific to your model. In general, testing the pressure relief valve involves the following steps:

  1. Place a bucket or container beneath the valve to catch any water that may be released.
  2. Lift the valve’s lever partially to allow some water to flow out and relieve pressure.
  3. If water continues to flow once you release the lever or the valve doesn’t seal properly afterward, it is recommended to replace the pressure relief valve.

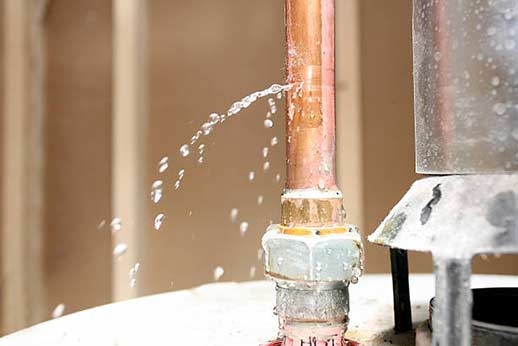
Step 6: Assess for Corrosion

If all previous steps have been completed and the leak persists, it is possible that corrosion has caused the issue. Carefully inspect the top of your water heater for signs of rust or corrosion. If corrosion is present and causing the leak, it may be necessary to reach out to a professional plumber to evaluate the extent of the damage and recommend appropriate solutions.

Step 7: Contact a Professional Plumber

If you have followed all the steps in this guide and the leak from the top of your water heater continues, it is advisable to contact a local plumber. They have the knowledge, skills, and equipment to diagnose the problem accurately and provide the most effective and long-lasting solution.

Preventative Measures

To avoid potential leaks and prolong the lifespan of your water heater, consider the following preventative measures:

  1. Regular Maintenance: Schedule annual maintenance for your water heater, including inspections, flushing, and testing of pressure relief valves.
  2. Temperature and Pressure Monitoring: Keep an eye on the temperature and pressure gauge of your water heater. If they consistently exceed recommended levels, it may indicate an underlying issue.
  3. Water Quality: Ensure your water heater is filled with good quality water. Consider installing a water softener or filter if your water supply has high mineral content.

Summing it Up

Dealing with a leaking water heater can be a stressful situation, but with the right knowledge and steps, you can address the issue effectively. Remember to prioritize your safety, turn off the power and water supply, and assess the potential causes of the leak. While certain problems can be resolved through DIY methods, don’t hesitate to seek professional help if needed. By following our step-by-step guide and implementing preventative measures, you can minimize the chances of future leaks and maintain the efficiency of your water heater for years to come.

Troubleshooting Water Heater Leaks: Identifying the Source and Fixing the Problem

the best way to fix water heater leaks is by calling a plumber.

Water heater leaks can be a frustrating and potentially damaging problem for homeowners. Not only can leaks lead to wasted water and higher utility bills, but they can also cause water damage to surrounding areas and even lead to mold growth if left unaddressed. In this article, we will discuss the importance of promptly identifying the source of water heater leaks and provide some troubleshooting steps to help homeowners fix the problem.

Understanding Water Heater Leaks

Before diving into the troubleshooting process, it’s important to have a basic understanding of how water heaters work and what causes leaks to occur. A typical residential water heater consists of a tank that holds and heats the water, along with various components such as inlet/outlet pipes, temperature and pressure relief valves, drain valves, and heating elements.

The most common types of water heater leaks occur from the following sources:

  • Leaking tank
  • Leaking inlet/outlet connections
  • Leaking temperature and pressure relief valve
  • Leaking drain valve

Identifying the Source of the Leak

When faced with a water heater leak, the first step is to identify the source of the problem. This can be done by following these steps:

Step 1: Inspect the Tank

Start by visually inspecting the water heater tank for any signs of leakage. Look for dripping water, puddles underneath the unit, or any visible corrosion or rust. If you notice any of these signs, there’s a good chance that the tank itself is leaking and may need to be replaced.

Step 2: Check the Inlet/Outlet Connections

Next, examine the inlet and outlet connections located at the top of the water heater. These connections are typically made using threaded fittings or soldered joints. Inspect the connections for any signs of water leakage or loose fittings. Tighten any loose connections and consider using Teflon tape or pipe joint compound to create a better seal.

Step 3: Inspect the Temperature and Pressure Relief Valve

The temperature and pressure relief valve is a crucial safety component of a water heater. It is designed to release excess pressure and prevent the tank from exploding. However, over time, these valves can become faulty and start to leak. Carefully inspect the valve for any signs of water leakage or mineral deposits. If you notice any issues, it’s recommended to replace the valve to ensure proper functioning.

Step 4: Check the Drain Valve

The drain valve is located near the bottom of the water heater and is used for periodic flushing of sediment buildup. It is not uncommon for the drain valve to develop a leak due to a faulty or loose connection. Examine the valve for any signs of leakage and tighten any loose fittings. If the valve itself is damaged, it may need to be replaced.

fixing water heater leaks is of utmost importance to prevent flooding.

Use a wrench to securely tighten the connections, but be careful not to overtighten and risk damaging the pipes or fittings.

Fixing the Water Heater Leak

Once you have identified the source of the water heater leak, you can take appropriate measures to fix the problem. The following steps will guide you through the process:

Step 1: Repairing Leaking Connections

If the leak is coming from the inlet/outlet connections, it is often a simple matter of tightening the fittings. Use a wrench to securely tighten the connections, but be careful not to overtighten and risk damaging the pipes or fittings. Apply Teflon tape or pipe joint compound to create a better seal if necessary.

Step 2: Replacing Faulty Valves

If the temperature and pressure relief valve or the drain valve is leaking, it’s best to replace the faulty valve with a new one. Turn off the power supply to the water heater and shut off the water supply before starting the replacement process. Follow the manufacturer’s instructions for proper installation and ensure that the new valve is compatible with your specific water heater model.

Step 3: Addressing Tank Leaks

If the water heater tank itself is leaking, unfortunately, repairing the leak may not be feasible. Water heater tanks are typically made of steel, which can corrode over time and develop leaks. In this case, the best course of action is to replace the entire water heater. Call a professional plumber who can help with selecting a suitable replacement and ensure proper installation.

Preventive Measures

While it’s not always possible to prevent water heater leaks, certain preventive measures can help minimize the risk. Consider implementing the following practices to keep your water heater in good working condition:

  • Perform regular maintenance, including flushing the tank to remove sediment buildup.
  • Monitor the pressure and temperature settings of your water heater and ensure they are within the recommended range.
  • Check for signs of corrosion or rust on the tank and promptly address any issues.
  • Periodically inspect the inlet/outlet connections, temperature and pressure relief valve, and drain valve for any signs of leakage.
  • Consider installing a drip pan underneath the water heater to catch any potential leaks and prevent water damage.

Conclusion

Water heater leaks are a common problem that homeowners may encounter. By promptly identifying the source of the leak and taking appropriate measures to fix the problem, you can prevent further damage and ensure the efficient functioning of your water heater. Regular maintenance and preventive measures can also help minimize the risk of future leaks. If you are unsure about troubleshooting or repairing your water heater, it is always recommended to seek the assistance of a professional plumber.

What to Do When Your Water Heater Leaks

a leaking water heater in need of repair.

Water heaters are an essential appliance in any home, providing hot water for bathing, cooking, and cleaning. However, like any other appliance, they can develop problems over time. One of the most common issues that homeowners face with their water heaters is a leak. A leaking water heater can not only result in a significant amount of water wastage but can also cause damage to the surrounding area and even your home. If you discover that your water heater is leaking, it’s essential to take immediate action to prevent further damage and ensure the safety of your home and family.

Determine the Source of the Leak

The first step in dealing with a leaking water heater is to identify the source of the leak. This will help you understand the severity of the problem and determine if it’s something you can fix yourself or if you need to call a professional plumber. Here are some common areas where water heaters tend to leak:

  • Pressure Relief Valve: This valve is designed to release excess pressure in the tank. If it becomes faulty, it can cause water to leak.
  • Drain Valve: The drain valve is located at the bottom of the tank and is used to empty the tank for maintenance or repairs. If it’s loose or faulty, it can cause water to leak.
  • Corroded Tank: Over time, the tank can corrode, leading to small cracks or holes through which water can escape.
  • Connections: The fittings and connections around the water heater can become loose or damaged, resulting in leaks.

Shut Off the Power and Water Supply

Once you have identified the source of the leak, it’s crucial to shut off the power and water supply to the water heater to prevent any further damage. This will ensure your safety while you work to resolve the issue. Here’s how you can do it:

  • Electric Water Heater: Locate your electrical panel and turn off the circuit breaker that controls the water heater. If you have a gas water heater, turn the gas supply valve to the “off” position.
  • Water Supply Valve: Close the water supply valve located on the cold water inlet pipe. This will stop the flow of water into the tank.
turn off main water supply.

It’s crucial to shut off the power and water supply to the water heater to prevent any further damage

Addressing the Leaks

Depending on the source of the leak, you can take different approaches to address and fix the problem. Here are some steps you can take:

  • Pressure Relief Valve Leak: If the pressure relief valve is leaking, it may indicate that the pressure in the tank is too high. You can try releasing some water from the valve to see if it stops the leak. However, if the problem persists, you may need to replace the valve.
  • Drain Valve Leak: If the drain valve is leaking, check if it’s loose. You can try tightening it with a wrench. If that doesn’t solve the issue, you may need to replace the valve.
  • Corroded Tank: If the tank is corroded and causing leaks, it’s likely that you will need to replace the water heater entirely. Corrosion is a sign of significant damage, and repairing it may not be a long-term solution.
  • Connections: If the connections around the water heater are leaking, you can try tightening them with a wrench. However, if the leakage continues, it’s best to call a local plumber to examine the fittings and make any necessary repairs.

Preventive Measures

To avoid water heater leaks in the future, there are a few preventive measures you can take:

  • Regular Maintenance: Schedule yearly inspections with a professional who can check for any signs of wear and tear and perform necessary maintenance tasks.
  • Temperature and Pressure Monitoring: Keep an eye on the temperature and pressure settings of your water heater. Excessive pressure can lead to leaks, so ensure they are within the recommended range.
  • Replace Anode Rods: Anode rods are sacrificial rods that attract corrosive elements and protect the tank from rust. Over time, these rods can deteriorate, so it’s important to have them replaced as needed.
  • Consider a Water Softener: If you live in an area with hard water, the minerals in the water can contribute to the corrosion of your water heater. Installing a water softener can help minimize the impact of these minerals.
plumber replacing a water heater in chicago.

When in doubt, always seek the guidance of a professional plumber to ensure the safety and efficiency of your water heater.

When to Call a Professional

While you may be able to address some minor water heater leaks on your own, it’s crucial to know when to call a professional plumber. Here are some situations where professional assistance is recommended:

  • Major Leaks: If the leak is substantial or causes water to accumulate rapidly, it’s best to turn off the water supply and seek professional help immediately.
  • Gas Water Heater: If you have a gas water heater and you suspect a gas leak along with the water leak, evacuate your home and call a professional immediately.
  • No Hot Water: If your water heater is leaking and you’re experiencing a lack of hot water, it may be an indication of a more significant underlying issue that requires professional attention.

In Conclusion

Discovering a water heater leak can be a stressful situation, but by following the appropriate steps, you can effectively address the issue and minimize damage. Remember to shut off the power and water supply, determine the source of the leak, and take the necessary actions to fix the problem. Regular maintenance and preventive measures can also help prevent water heater leaks in the future. And, when in doubt, always seek the guidance of a professional plumber to ensure the safety and efficiency of your water heater.

error: Content is protected !!