Blog

How to Recognize a Problematic Tankless Water Heater: 6 Telltale Signs

How to Recognize a Problematic Tankless Water Heater

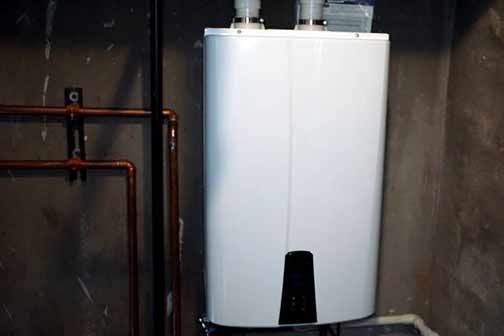
Adding a tankless water heater to your home is an excellent way to improve the efficiency of your hot water supply systems, says Yourway Properties. Tankless water heaters produce hot water on demand. Since they do not need to run constantly to produce hot water, they are very energy-efficient.

Their compact design also means you can install them where you could not install a traditional water heater. A third benefit of tankless water heaters is they never run out of hot water, as long as you buy the right size for your home and the unit is installed correctly.

However, because a tankless water heater is a precision device, it is quite sensitive to problems in its components. Small changes in the way the system is supposed to work can have major impacts on the overall performance of your tankless water heater.

This is why it is important to know the telltale signs of problems in a tankless water heater. Being able to detect the early signs of malfunction and fix the issues before they get worse is essential if you want to avoid water heater emergencies in your home.

What are the typical warning signs that a tankless water heater is in trouble?

6 signs of problems in a tankless water heater

Low water pressure

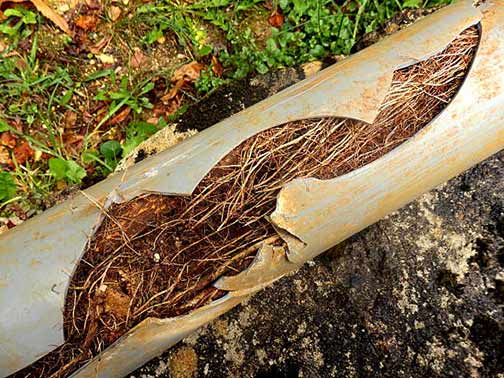
Low water pressure in the hot water line may be due to blockages or leaks. The buildup is a common problem in the intake and outtake lines of a tankless water heater. That problem is worse in areas where the water is hard. Slow sediment buildup inside the lines can narrow pipe channels and impair their ability to supply water. Low water pressure can also result from leaks in the hot water lines. A third possibility is problems at the local water company.

Lukewarm water

There are three main reasons why a tankless water heater will produce lukewarm water. It could be due to mineral buildup on the heat exchanger; this will impair the device’s ability to heat water. Descaling the water heater will fix this problem. A tankless water heater will also produce lukewarm water if the gas burners are dysfunctional. The third reason for this problem is inadequate gas supply to the burner. An experienced water heater technician can help you pinpoint the exact cause of the problem.

Water temperature fluctuations

This is when water from the water heater is first warm, then turns cold, before getting hot again. Possible causes of the problem are a worn-out flow sensor or a plumbing crossover that allows hot and cold water to mix. The third and most common cause of this problem is a cold water sandwich, which is not a big deal. Temperature fluctuations due to a cold water sandwich can be solved by not stepping into the shower immediately after you turn on the hot water.

The water heater keeps shutting off

Your tankless water heater has a safety device that shuts the system to prevent damage if it senses a major issue. This could be why your tankless water heater keeps shutting off. Common problems that trigger this shut-down mechanism include a clogged whole-house filter connected to the water heater, a loose wire in the system, low water flow rate (the water heater is not getting enough water) and problems with the unit’s gas or electricity supply.

The gas burner is not igniting

If its gas burners won’t ignite, your tankless water heater cannot heat water. A fairly common reason for this problem is an empty propane tank. It could also be because the gas valve is not fully opened. If opening the gas valve does not solve the problem, there is a chance that the ignition pack has failed. This problem could also be due to issues with the ventilation system or excessive condensation could be putting out the flame. A professional plumber can determine the exact cause of the problem.

Noisy burners

This is often due to debris that is sticking to the fan. A leak in the sealed combustion chamber can also interfere with combustion, resulting in strange noises. If the system is not venting properly, it can cause weird sounds from your tankless water heater. Another issue that causes worrisome sounds from a tankless water heater is the mineral buildup on the components of the water heater. To eliminate the probable causes of this problem and detect the root cause, you will need a licensed water heater repair service.

Now that you know why your tankless water heater is having issues, what is the next step?

Most water heaters that are tankless have problems can easily be fixed by a professional technician. But you may also have to replace the water heater if the issues are too far gone to be repaired or the water heater is too small for your home.

To ascertain the exact next steps to fix your tankless water heater problems, you may want to talk to a professional plumber.

Steps to Boost Your Home’s Water Pressure in Chicago

Steps to Boost Your Home's Water Pressure in Chicago

Understanding Water Pressure and Its Importance

Water pressure is an essential aspect of a home’s plumbing system. It represents the force with which water is delivered to various fixtures such as faucets, showers, and appliances. Optimal water pressure ensures comfortable showers, effective cleaning, and efficient operation of home appliances. Low water pressure can be a significant inconvenience, affecting daily activities and overall household functionality.

Identifying the Causes of Low Water Pressure in Chicago Homes

Several factors can contribute to low water pressure in homes, especially in a city like Chicago with older infrastructure. Common causes include:

  • Aging Pipes: Older homes often have pipes that are corroded or clogged with mineral deposits, leading to reduced water flow.
  • Municipal Supply Issues: Sometimes, the problem might not be within your home but rather in the municipal water supply system.
  • Pressure Regulator Malfunction: If your home is equipped with a water pressure regulator, a malfunction or incorrect setting can result in low water pressure.
  • Leaks and Drips: Undetected leaks in your plumbing system can significantly diminish water pressure.
  • Partial Closure of Valves: Partially closed shut-off valves or water meter valves can restrict water flow.

Step 1: Check and Replace Any Faulty Fixtures

The first step in boosting your home’s water pressure is to check all faucets, showerheads, and other fixtures. Older fixtures may become clogged with mineral deposits over time, reducing water flow. Cleaning or replacing these fixtures can make a noticeable difference. Opt for low-resistance, high-flow models for the best results.

Step 2: Inspect and Clean Your Home’s Pipes

Over time, pipes can become clogged with debris, sediment, and mineral buildup. Inspect your home’s plumbing system for any obstructions. In older homes, upgrading your plumbing pipes with modern materials like copper or PEX can dramatically improve water pressure. For minor clogs, a professional plumber can perform pipe cleaning using special tools and techniques.

Step 3: Test and Adjust the Water Pressure Regulator

Many homes are equipped with a water pressure regulator, which controls the pressure of water entering your home from the municipal supply. Locate the regulator, typically found near the main shut-off valve, and use a pressure gauge to measure the current water pressure. If the pressure is below the recommended level (usually 40-60 psi), adjust the regulator accordingly or consider replacing it if it’s malfunctioning.

Step 4: Check for Leaks and Repair Them

Undetected leaks can significantly reduce water pressure. Inspect your plumbing system for any signs of leaks, such as damp spots, mold growth, or unexplained spikes in your water bill. Repairing leaks promptly will not only improve water pressure but also conserve water and reduce costs.

Step 5: Consider Installing a Water Pressure Booster Pump

If your home experiences consistently low water pressure despite taking the above steps, installing a water pressure booster pump may be a viable solution. These pumps are designed to increase water pressure and flow, ensuring that all fixtures and appliances receive adequate water supply. A professional plumber can recommend and install a suitable booster pump system for your home.

Step 6: Work with the City’s Water Department

In some cases, low water pressure might be attributed to issues within the municipal water supply system. Contact Chicago’s water department to report any ongoing low pressure issues in your area. They can provide information on any maintenance or repairs scheduled for your neighborhood that might affect water pressure and may even offer additional solutions or assistance.

Step 7: Regular Maintenance and Preventive Measures

Ensuring optimal water pressure in your home requires ongoing maintenance and preventive measures. Regularly check and clean fixtures, inspect pipes for any signs of corrosion or buildup, and monitor your water pressure levels. Scheduling periodic professional plumbing inspections can help identify and address potential problems before they lead to significant issues.

a man showering.

Well-maintained water pressure can prolong the lifespan of your plumbing system and fixtures.

Benefits of Optimal Water Pressure

Maintaining optimal water pressure in your home offers several benefits, including:

  • Enhanced Comfort: Enjoy consistent and strong water flow for showers and bathtubs.
  • Efficient Cleaning: Improved water pressure ensures effective cleaning of dishes, laundry, and household surfaces.
  • Appliance Performance: Optimal water pressure helps appliances like dishwashers and washing machines operate more efficiently.
  • Reduced Water Waste: Proper water pressure minimizes water waste, contributing to conservation efforts and lower water bills.
  • Prolonged Plumbing Lifespan: Well-maintained water pressure can prolong the lifespan of your plumbing system and fixtures.

Conclusion and Final Tips

Boosting your home’s water pressure involves understanding the underlying issues, from fixture maintenance to addressing piping and regulator concerns. By following these steps and implementing regular plumbing maintenance, you can achieve and maintain optimal water pressure in your Chicago home. Don’t hesitate to seek professional help when needed, and stay proactive in ensuring your plumbing system’s health and efficiency.

Remember, a well-functioning water pressure system enhances daily living, provides comfort, and ensures the longevity of your plumbing infrastructure. Take these steps today to improve your home’s water pressure and enjoy the benefits of a well-maintained plumbing system.

Immediate Steps to Take When Your Sump Pump Overflows

Immediate Steps to Take When Your Sump Pump Overflows

Understanding the Cause of a Sump Pump Overflow

When confronted with a sump pump overflow, the first step is to understand the underlying causes. Sump pumps are designed to remove water that accumulates in the sump basin, typically found in basements of homes. This situation usually arises due to excessive rainfall, high groundwater levels, or plumbing issues. Knowing the root cause is essential as it will guide you in choosing the right actions to mitigate and prevent future overflows.

Safety First: Switch Off Electricity

Electrical safety is paramount in the event of a sump pump overflow. Water and electricity are a hazardous combination that can lead to serious injuries or even fatalities. Begin by turning off the power to the affected area. Locate your home’s circuit breaker and switch off the power supply to the basement or the specific room where the sump pump is installed. This precaution ensures that you can safely proceed with addressing the overflow.

Remove Excess Water

With the power switched off, the next immediate step is to remove the excess water. Use a wet/dry vacuum to suck up standing water inside the sump pump area and surrounding floor. If the vacuum is insufficient or you do not have one available, employ buckets, mops, and towels to control the situation. Quick water removal helps in minimizing damage and prevents potential mold and mildew growth.

Inspect the Sump Pump System

Once excess water removal is underway, it is crucial to inspect the sump pump system to identify and resolve issues that caused the overflow. Examine the sump pump pit for debris that might have clogged the pump, inspect the discharge pipe for blockages, and ensure that the check valve is functioning properly. Clear any debris that may be obstructing the pump and piping.

Clean and Sanitize the Affected Area

After water removal and sump pump inspection, prioritize cleaning and sanitizing the affected area. Use a mixture of water and household bleach to disinfect the surfaces inundated by the overflow. This action reduces the risk of mold, bacteria, and mildew development that can compromise indoor air quality and health. Ensure thorough drying of the area by utilizing fans or a dehumidifier.

Contact a Professional Plumber

While basic troubleshooting may resolve minor sump pump issues, contacting a professional plumber is advisable for a comprehensive evaluation and repair. A qualified plumber can provide expert diagnosis, prevent recurrent overflows, and ensure that your sump pump system functions optimally. Routine maintenance can also be scheduled to detect early warning signs and extend the life of your sump pump.

a sump pump specialist making a repair.

While basic troubleshooting may resolve minor sump pump issues, contacting a professional plumber is advisable for a comprehensive evaluation and repair.

Evaluate Potential Waterproofing Solutions

In addition to fixing the immediate problem, evaluate the need for waterproofing solutions in your basement. Consider installing a backup sump pump battery that can activate when the primary sump pump fails. Implement other waterproofing measures such as sealing wall cracks, installing exterior drainage systems, and ensuring proper gutter and downspout functionality to divert water away from your home. These preventative steps can safeguard your property from future overflows and water damage.

Check for Insurance Coverage

If you have homeowners insurance, review your policy to determine if water damage is covered. Document the overflow event with photographs and detailed descriptions to support your claim if applicable. Promptly notify your insurance provider about the incident for guidance on coverage options and reimbursement claims for repairs and restoration work.

Educate Household Members on Emergency Procedures

Ensure that all household members are informed about the correct emergency procedures in the event of a sump pump overflow. Create a family emergency plan that outlines safety steps such as switching off electricity, contacting an emergency plumber, and using water removal equipment. Regularly review and practice these procedures to prepare everyone for quick and effective action during unforeseen events.

Maintain Regular Sump Pump Inspections

Even after resolving an overflow, schedule regular maintenance and inspections for your sump pump system. Regular upkeep involves cleaning the pump and basin, inspecting and testing the float switch, checking the backup battery, and confirming that the discharge line is clear. Periodic maintenance ensures that your sump pump remains in optimum working condition and reduces the risk of future overflows.

Conclusion: Proactive Measures for Sump Pump Management

Addressing a sump pump overflow requires immediate and methodical steps to ensure safety and prevent extensive water damage. Understand the underlying causes, prioritize electrical safety, remove excess water, inspect the system, clean the area, and seek professional help. Furthermore, consider waterproofing enhancements, check insurance coverage, educate household members, and maintain routine inspections to manage and prevent sump pump overflows effectively.

Critical Plumbing Repairs to Ensure a Smooth Home Sale

Critical Plumbing Repairs to Ensure a Smooth Home Sale

How do you sell your home when there are many sellers, not so many buyers, and you are trying to maximize sales profits? This question has troubled property owners everywhere, regardless of what season of the year they are trying to sell their homes.

To solve this challenge, sellers will often renovate the critical features of their home to make it more attractive to buyers. The thinking here is that, if a property has great curb appeal and its features are modern and in top condition, buyers will be willing to pay more for it.

However, Atlas Management says, this strategy only works if sellers know what buyers in their location want. How do homeowners know that a kitchen or bathroom renovation will help them sell their homes faster and for more money? Is this type of renovation something buyers are looking for?

There is a better way to solve this problem.

Homeowners should prioritize renovations that buyers are guaranteed to value. They should focus on those features of the home that will never go out of fashion but can retain their value despite a home’s location and what is happening in the housing market.

This means improving the essential features of the home instead of focusing on cosmetic improvements. An example of an area sellers should focus on is their home’s plumbing. Up-to-date plumbing systems that are easy to maintain will never go out of style.

Savvy buyers prefer a home with well-maintained plumbing than one with a nice kitchen and a neglected sewer line. A home with an updated plumbing system is a safer bet because it is hard to tell how bad a home’s plumbing issues are and how much it will cost to fix them.

a tankless water heater can improve a home's value.

Tankless water heaters are more efficient than traditional water heaters; they use less energy. Additionally, not only do they take up less space, they add a modern feel to the home.

The top plumbing repairs and updates for a smooth home sale

Address water pressure issues

Buyers expect sufficient and consistent water pressure when they flush a toilet, open a faucet or turn on the dishwasher. Low water pressure can be a telltale sign of bigger issues in the plumbing. How you fix the water pressure issues in the home depends on the source of the problem.

Fix leaky pipes and appliances

Leaks that happen inside the walls of a home, below ground and in hidden parts of the house (under the sink, behind appliances and in the basement) are notoriously hard to detect. Hidden leaks not only waste water, they can cause major water damage.

Replace old water pipes

Repiping your home is a major expense, but it is worth it. This step will address all lingering issues caused by old and corroded pipes; leaks, water discoloration, low water pressure and strange noises from the plumbing. Buyers will pay you more for a home the has just been repiped.

Schedule drain maintenance

Professional drain maintenance done on a schedule can help to solve the drain issues in a home; slow drains, bad odors from drain outlets and noisy drains. To make sure you are solving the actual problems in your drains, a sewer line camera inspection should precede this maintenance step.

Install efficient plumbing fixtures

Buyers love features that help them save money while protecting the environment. Low-flow plumbing fixtures help to lower a home’s water bills. Buyers know that the extra money they pay to buy a home with eco-friendly features will be recouped through lower energy bills and other benefits.

Add a tankless water heater

Tankless water heaters are more efficient than traditional water heaters; they use less energy. Additionally, not only do they take up less space, they add a modern feel to the home. A tankless water heater installation is another energy-efficient and eco-friendly update that buyers are willing to pay more to have.

Insulate your water pipes

Insulating your water pipes will improve the overall efficiency of your plumbing by eliminating the risk of frozen pipes. You also lower the home’s energy cost by reducing the work your water heater does to heat water. This step also minimizes the risk of water damage due to frozen pipes.

Add a water filtration system

Water filtration systems help to address buyers’ health and safety concerns. Potential buyers are assured they will not face problems like impurities, contaminants, and unwanted odors or tastes in their water supply. Most buyers will pay more money to get that peace of mind.

Lastly, you should order a professional plumbing inspection and make the inspection report available to potential buyers. This kind of transparency is a big deal for buyers. Because buyers can see that you are not trying to hide the true condition of your home’s plumbing, they trust you more.

This helps to make the negotiations easier. Since both are less suspicious of one another, it is not hard to reach a compromise on issues. Doing a plumbing inspection does not mean you have to fix all the issues in your plumbing. It means you know the existing problems, you can choose what issues you want to repair and buyers also understand what they are getting into.

Is Your Sewer Line on the Brink of Failure?

Is Your Sewer Line on the Brink of Failure

Signs Your Sewer Line May Be Failing

The sewer line in your home is an essential part of your plumbing system. Without it, waste from your home wouldn’t be able to properly drain into the city’s sewer system or your home’s septic tank. For this reason, it’s crucial to address any issues related to your sewer line before they escalate. Let’s explore the various signs that may indicate your sewer line is on the brink of failure.

One of the earliest indicators of a failing sewer line is a slow drain. If you notice that your sinks or bathtubs are taking longer than usual to drain, it could point to a blockage in your sewer line. Similarly, gurgling sounds coming from your drains can also be a red flag. These noises are often caused by air trapped in the pipes due to a blockage.

Another tell-tale sign of sewer line issues is the presence of foul odors. If you can smell sewage in your home or yard, it’s time to call a plumber. This stench typically indicates that there’s a crack or break in the sewer line, allowing waste material to escape.

Lastly, if you observe patches of lush greenery in your yard, it may not be a cause for celebration. While it’s nice to have a green yard, it can also mean that a leaking sewer line is fertilizing your lawn. Sewage acts as a potent fertilizer, causing an overgrowth in the affected areas.

Common Causes of Sewer Line Damage

Sewer line damage can occur for a variety of reasons, each challenging in its own right. Understanding the most common causes can help you take preventive measures and mitigate the risk of severe damage.

Tree roots are notorious for causing sewer line issues. As trees grow, their roots extend and can penetrate the sewer lines, causing blockages and cracks. This is particularly common in older homes where trees have had ample time to grow and spread.

Another common cause of sewer line damage is shifting soil. Natural occurrences like earthquakes or human activities such as construction work can cause the ground to move and put pressure on your sewer lines, causing them to crack or collapse.

Unfortunately, sewer lines aren’t immune to general wear and tear. Over time, they will naturally deteriorate, especially in older properties where the pipes might be decades old. Materials such as clay or cast iron, often used in older systems, are particularly susceptible to corrosion and breaking down over time.

Grease buildup is also a frequent culprit behind sewer line damage. Pouring fats, oils, and grease down the drain can cause serious blockages as these substances solidify and accumulate over time within the pipes.

Importance of Regular Sewer Camera Inspections

Proactive maintenance is the key to extending the life of your sewer line and preventing costly repairs. Regular sewer camera inspections can help identify potential issues before they escalate into major problems.

A sewer camera inspection typically involves the use of a specialized camera to thoroughly examine the interior of your sewer pipes. This process allows plumbers to identify blockages, cracks, and other forms of damage that need to be addressed. By catching problems early, you can often avoid extensive repairs and maintain the integrity of your plumbing system.

Additionally, regular inspections can provide you with peace of mind. Knowing that your sewer line is in good condition can relieve stress and give you confidence in the health of your home’s plumbing system. It’s generally recommended to have your sewer line camera inspected every couple of years, or more frequently if your home is older or if you suspect issues.

a sewer camera inspection taking place.

By catching problems early, you can often avoid extensive repairs and maintain the integrity of your plumbing system.

Options for Resolving Sewer Line Issues

If you have identified signs of sewer line damage or your recent inspection has uncovered problems, there are several options available to address these issues. The right choice will depend on the specific nature of your sewer line problem.

One of the least invasive solutions is hydro jetting. This technique involves using highly pressurized water to clear obstructions and clean the interiors of your pipes. A professional hydro jetting service is especially effective for removing grease and debris buildup.

For problems caused by tree roots, root removal procedures might be necessary. Plumbers can use specialized tools to cut through the roots and clear the pipes. However, if the roots have caused substantial damage, further sewer line repairs may be needed.

Preventive Measures to Protect Your Sewer Line

While some causes of sewer line damage are outside your control, there are several preventive measures you can take to protect your sewer line and minimize the risk of damage.

First and foremost, be mindful of what you flush and pour down your drains. Avoid flushing items such as wipes, feminine hygiene products, and paper towels, as these can cause blockages. Similarly, refrain from pouring fats, oils, and grease down the drain. Instead, dispose of them in the trash.

In addition, consider the placement of trees and shrubs in your yard. Be aware of the proximity of these plants to your sewer lines, and choose species with less aggressive root systems to minimize the risk of root infiltration.

Regularly maintain your plumbing system by scheduling professional inspections and cleanings. Routine maintenance can help catch small issues before they develop into significant problems, saving you time, money, and stress.

The Benefits of Addressing Sewer Line Issues Early

Tackling sewer line issues early on offers several advantages, not the least of which is cost savings. Repairing a small crack or blockage is often far less expensive than the major work required to address extensive damage.

Prompt attention to sewer line problems also helps preserve your property’s value. A well-maintained plumbing system is a key selling point for potential buyers, and documented maintenance records can be a valuable asset during home inspections and negotiations.

Moreover, addressing sewer line issues early can prevent health hazards. Leaking sewage can contaminate your home and yard, posing serious health risks to you and your family. Ensuring your plumbing system is in good working order can protect both your home and your wellbeing.

Summing It Up

Though often out of sight and out of mind, your sewer line plays a critical role in maintaining the health and functionality of your home’s plumbing system. By being aware of the potential signs of failure, understanding the common causes of damage, and taking preventive measures, you can protect your property and avoid costly repairs. Regular inspections and timely interventions are essential to ensuring your sewer line remains in optimal condition. Act promptly at the first sign of trouble, and don’t hesitate to seek professional help to diagnose and address any issues.

Sump Pumps and Rain: Everything Homeowners Need to Know

Sump Pumps and Rain

Sump pumps are vital components for many homeowners, particularly those living in areas prone to heavy rainfall or high water tables. These devices are designed to remove accumulated water from basements and crawl spaces, thus preventing flooding and water damage. Understanding the importance and functionality of sump pumps can help homeowners protect their properties and ensure the longevity of their basements.

Understanding How Sump Pumps Work

Sump pumps are typically installed in the lowest part of a basement or crawl space, where they can effectively gather and pump out excess water. They operate through a simple yet efficient mechanism: when water collects in the sump pit (a hole constructed to collect water), a float switch activates the pump. This switch prompts the pump to move water away from the foundation through a discharge pipe, directing it to a designated drainage area, typically a storm drain, dry well, or detention pond.

Different Types of Sump Pumps

Sump pumps come in various types, each with its specific applications and benefits. The two primary types are:

  • Submersible Sump Pumps: These pumps are designed to operate underwater and are installed inside the sump pit. They are generally quieter and more efficient in large volumes of water.
  • Pedestal Sump Pumps: Unlike submersible pumps, pedestal pumps have the motor positioned above the basin, making them easier to access for maintenance, though they tend to be noisier.

The Importance of Sump Pumps During the Rainy Season

Rainy seasons bring increased precipitation, which can lead to higher chances of basement flooding. Sump pumps act as a crucial line of defense during such times, ensuring that excess water is promptly removed and that homes remain dry. Their ability to swiftly deal with water influxes helps prevent structural damage, mold growth, and other water related issues.

Regular Maintenance of Sump Pumps

To ensure optimal performance, regular sump pump maintenance is essential. Homeowners should perform the following steps:

  • Test the Float Switch: Verify that the float switch moves freely and triggers the pump when water levels rise.
  • Check the Discharge Pipe: Ensure the discharge line is free from obstructions and ice (during colder months) and positioned to direct water away from the house.
  • Backup Power Supply: Equip the pump with a battery backup or generator to ensure it operates during power outages, which are common during storms.
  • Annual Professional Inspection: Have a professional plumber inspect the sump pump system annually to address any potential issues and provide expert maintenance.
a secondary sump pump back up installation.

Homeowners should also consider whether they need additional features such as battery backups, water alarms, or automatic triggers.

Quick Fixes for Common Sump Pump Issues

Despite regular maintenance, homeowners may encounter common issues with their sump pumps. Here are some solutions to common problems:

  • No Power: Ensure the pump is plugged in properly and check the circuit breaker. If needed, reset it or have an electrician inspect the outlet.
  • Clogged Pump or Discharge Pipe: Remove any debris blocking the intake screen or discharge pipe, and consider installing a grate over the sump pit to prevent future clogs.
  • Stuck Float Switch: Adjust or clean the float switch to ensure it can move freely and avoid sticking.
  • Continuous Running: Check for stuck float switches, a blocked discharge pipe, or a malfunctioning switch and address accordingly.

The Role of Professional Inspections

In addition to regular DIY maintenance, professional inspections play a crucial role in maintaining a sump pump’s effectiveness. Professionals have the expertise to identify potential issues that may not be apparent during routine checks and can offer advanced maintenance and repairs. By scheduling an annual inspection with a certified plumber or sump pump specialist, homeowners can prolong their pump’s lifespan and ensure their systems are prepared for heavy rainfall and prevent a premature sump pump replacement.

Choosing the Right Sump Pump for Your Home

Selecting the appropriate sump pump involves considering factors such as the frequency and volume of water needing to be managed, the size of the sump pit, and power supply requirements. Homeowners should also consider whether they need additional features such as battery backups, water alarms, or automatic triggers. Speaking with professional plumbers can help in making an informed decision tailored to specific home requirements and local conditions.

Preventing Basement Flooding Beyond Sump Pumps

While sump pumps are powerful tools for preventing basement flooding, comprehensive home protection includes additional measures such as:

  • Proper Grading: Ensure the land around the home slopes away from the foundation to direct water away from the basement.
  • Gutter Maintenance: Regularly clean and maintain gutters and downspouts to ensure water is effectively directed away from the house.
  • Sealing Cracks: Seal any visible cracks in the foundation or basement walls to prevent water seepage.

Summing It Up

Understanding sump pumps and their critical role during the rainy season can empower homeowners to take proactive steps in maintaining and protecting their homes from water damage. Regular maintenance, quick troubleshooting, professional inspections, and additional preventive measures can ensure the effectiveness and longevity of sump pump systems. By staying informed and prepared, homeowners can successfully navigate the challenges posed by heavy rainfall and safeguard their basements year-round.

Professional Tips for Unclogging a Bathroom Sink

Professional Tips for Unclogging a Bathroom Sink

Understanding the Causes of a Clogged Bathroom Sink

Before we get into the techniques for unclogging a bathroom sink, it’s essential to understand what typically causes the clogs. Recognizing these factors can help prevent future issues. Common causes include the accumulation of hair, soap scum, toothpaste, and other debris that gradually build up over time. Additionally, foreign objects such as jewelry, hairpins, and small items can get accidentally dropped into the sink, contributing to blockages.

Preventive Measures to Avoid Sink Clogs

Prevention is always better than cure. Implementing simple preventive measures can go a long way in keeping your bathroom sink free from clogs. Here are some useful tips:

1. Use a drain cover to catch hair and debris.

2. Clean the drain cover and sink regularly to remove any buildup.

3. Avoid disposing of solid items or thick liquids down the sink.

4. Run hot water through the drain occasionally to flush out potential obstructions.

Immediate Steps to Take When You Notice a Slow Drain

In the event you observe slow drainage, swift action can help prevent the clog from worsening. Begin by removing any visible debris around the drain area. Next, prepare a mixture of baking soda and vinegar, pour it down the drain, and let it sit for about 20 minutes. This solution can break down minor clogs and maintain a clean drainpipe.

Using a Plunger for Effective Unclogging

One of the most reliable tools to combat a clogged sink is a plunger. To use it effectively, follow these steps:

1. Ensure there is enough water in the sink to cover the plunger’s rubber cup.

2. Place the plunger over the drain, ensuring a tight seal.

3. Push and pull the plunger rapidly to create suction and pressure that can dislodge the clog.

4. Remove the plunger and observe if the water drains properly.

Employing a Drain Snake for Stubborn Clogs

For more stubborn clogs that the plunger cannot handle, a drain snake (or auger) is highly effective. Here’s how to use it:

1. Insert the end of the drain snake into the drain, feeding it slowly while turning the handle.

2. Once you encounter resistance, rotate the snake to break up or hook the clog.

3. Gently pull the snake back out, removing any debris it has captured.

4. Run water down the drain to ensure it is clear.

a woman plunging her bathroom sink.

Push and pull the plunger rapidly to create suction and pressure that can dislodge the clog.

Utilizing a Wet-Dry Vacuum for Clog Removal

If available, a wet-dry vacuum can be a powerful tool in unclogging a sink.

1. Set the vacuum to the wet setting

2. Create a tight seal over the drain using the vacuum hose.

3. Turn the vacuum on, allowing it to suck out the obstruction.

4. Check if the water now flows freely down the drain.

Chemical Drain Cleaners: A Cautious Approach

Chemical drain cleaners can be a quick fix but should be used sparingly and cautiously due to their potentially harmful effects on pipes and the environment. If you choose to use a chemical cleaner, follow the manufacturer’s instructions carefully. Remember, frequent reliance on chemical cleaners is not advisable as it can damage your plumbing over time.

Disassembling the P-Trap for Deep Cleaning

If none of the above methods work, disassembling the P-trap may be necessary. This U-shaped pipe beneath your sink can trap debris over time. To clean it:

1. Place a bucket under the P-trap to catch any water or debris.

2. Loosen the slip nuts holding the P-trap in place using a wrench.

3. Remove the P-trap and clean out any accumulated gunk.

4. Reassemble the P-trap, ensuring all connections are secure.

5. Run water to check for proper drainage.

Seeking Professional Help for Persistent Problems

If you cannot resolve the clog using the above methods, it may be time to seek professional drain cleaning assistance. A licensed plumber has the tools and expertise to tackle stubborn clogs and can identify any underlying issues with your plumbing.

Maintaining Your Bathroom Sink for Longevity

Regular maintenance can prevent the recurrence of clogs and ensure your bathroom sink remains in optimal condition. Establish a routine cleaning schedule using natural cleaners such as baking soda and vinegar, and have a plumber camera inspect the drain periodically for early signs of blockage.

Conclusion: A Clog-Free Future

Unclogging a bathroom sink requires a clear understanding of the causes, preventive measures, and effective techniques. By following the professional tips provided in this guide, you can ensure a smooth and hassle free experience. Regular maintenance and timely intervention can help keep your sink functional and clog-free, contributing to a more convenient and efficient bathroom environment.

Protect Your Pipes: Preparing for Freezing Temperatures

protect your pipes from freezing temperatures

Importance of Protecting Pipes in Cold Weather

Understanding why it is essential to protect your pipes during cold weather is crucial for every homeowner. Freezing temperatures can cause significant damage to your home’s plumbing system. When the water inside pipes freezes, it expands, which can cause the pipes to burst. This not only leads to costly repairs but also to potential water damage within your home. Additionally, protecting your pipes ensures a continuous water supply even during the coldest months, thereby maintaining daily life conveniences.

Understanding the Risks of Frozen Pipes

Frozen pipes pose a multitude of risks extending beyond just burst pipes. When pipes freeze, they can block the supply of water, disrupting daily activities such as cooking, bathing, and cleaning. Moreover, thawing frozen pipes improperly can lead to further damage or even cause fires if incorrect methods are used, such as applying direct heat from a blow torch. The inconvenience, safety risks, and financial burden from dealing with frozen pipes highlight the importance of taking preventive measures.

Signs Your Pipes Might Be Freezing

Detecting early signs that your pipes are freezing can help you take swift action to prevent significant damage. Common indicators include:

– Reduced or no water flow from faucets

– Unusually cold water

– Frost or condensation on the outside of pipes

– Strange noises from the plumbing system, such as banging or clanking

Recognizing these signs early allows you to implement immediate measures to mitigate damage and maintain the integrity of your home’s plumbing system.

Immediate Steps to Take if Pipes Freeze

In the unfortunate event that you discover frozen pipes, quick action can help limit the damage. Here are the steps to take immediately:

– Shut off the main water supply to prevent water from flooding your home once the pipe thaws.

– Open faucets to allow water to escape as it thaws, reducing pressure buildup within the pipes.

– Apply heat to the frozen section of the pipe using a hairdryer, heating pad, or warm towels, but avoid using open flames or high heat devices.

– Call a professional plumber if you are unable to thaw the pipes safely or if you suspect significant damage.

a burst pipe.

Maintain a consistent indoor temperature, even when you are not home, to prevent the pipes from getting too cold.

How to Prevent Pipes from Freezing

Prevention is the best approach when it comes to protecting your pipes from freezing. Consider these preventive measures:

– Insulate exposed pipes with foam insulation sleeves or heat tape, especially those in unheated areas like basements, attics, and garages.

– Seal gaps and cracks in your home’s exterior walls and foundation to prevent cold air infiltration.

– Allow a trickle of water to flow from faucets during extreme cold spells to keep water moving within the pipes.

– Maintain a consistent indoor temperature, even when you are not home, to prevent the pipes from getting too cold.

Long-Term Solutions for Pipe Protection

For long-term protection, consider investing in more permanent solutions such as:

– Installing pipe insulation throughout your home

– Re-routing pipes to less vulnerable areas, such as interior walls

– Consider upgrading your home plumbing piping materials

– Installing a pipe-heating system that activates during low temperatures

These investments will ensure your pipes remain safe year after year, providing peace of mind and avoiding costly emergencies.

Winterizing Outdoor Plumbing

Outdoor plumbing fixtures, such as hose bibs and sprinkler systems, require special attention during winter. Steps to winterize these include:

– Disconnecting and draining garden hoses

– Shutting off and draining sprinkler system lines

– Insulating hose bibs with faucet covers

– Draining outdoor water features, such as fountains and pools, to prevent freezing

Properly winterizing outdoor plumbing helps protect these systems from damage and ensures they are ready to use when warmer weather returns.

Emergency Services and When to Call a Professional

Knowing when to call in professional help is essential in managing frozen pipes and dealing with a burst plumbing pipe emergency. Contact a plumber immediately if:

– You cannot locate the frozen section of the pipe

– You cannot safely thaw the pipe yourself

– The pipe has burst, causing flooding or significant water damage

– Your DIY efforts do not restore water flow

Professionals have the expertise and equipment necessary to handle these situations safely and effectively, preventing further damage and costly repairs.

Cost Implications of Ignoring Frozen Pipes

Ignoring the issue of frozen pipes can lead to substantial financial consequences. Burst pipes can result in extensive water damage, necessitating repairs to ceilings, walls, flooring, and personal property. Additionally, prolonged exposure to moisture can lead to mold growth, which is difficult and expensive to remediate. The cost of emergency plumbing services and subsequent repairs can quickly add up, making preventive measures and timely intervention more cost effective in the long run.

Wrapping It Up

In conclusion, preparing your home’s pipes for freezing temperatures is an essential aspect of winter home maintenance. By understanding the risks, recognizing early warning signs, taking immediate action, and implementing preventive measures, you can safeguard your plumbing system and avoid costly repairs. Whether through simple DIY steps or investing in long-term solutions, ensuring your pipes are protected will provide peace of mind and maintain the comfort and functionality of your home during the colder months.

Effective Solutions for Basement Drain Backups Post-Heavy Rain

Effective Solutions for Basement Drain Backups Post-Heavy Rain

Basement drain backups can be a homeowner’s worst nightmare, especially after heavy rainfall. These issues not only cause significant water damage but also create health hazards due to mold growth and bacterial contamination. To address this problem effectively, it’s crucial to understand the root causes and the most effective solutions to prevent future incidents. Here we provide an in-depth look at professional and proven measures to ensure your basement remains dry and safe.

Identifying the Causes of Basement Drain Backups

Heavy rain can overwhelm drainage systems, leading to basement backups. However, several factors contribute to this problem, including:

  • Insufficient Slope in Yard: A yard lacking proper slope can lead to water pooling around your foundation, making it susceptible to basement drain backups.
  • Clogged Gutters and Downspouts: Gutters and downspouts clogged with debris can prevent water from being channeled away from your home effectively.
  • Foundation Cracks: Cracks in the foundation walls allow water to seep into the basement, exacerbating drainage issues.
  • Overcharged Sewer System: Public sewer systems can become overcharged during heavy rain, causing water to back up into residential basements.
  • Tree Roots in Sewer Lines: Tree roots can invade and clog sewer lines, obstructing the flow of water and causing backups during rainstorms.

Emergency Measures During a Basement Drain Backup

If you experience a basement drain backup during heavy rain, immediate action is critical to minimize damage and maintain safety. Here are essential steps to take:

Precautionary Safety Measures: Ensure that the power supply to the affected area is turned off to prevent electrical hazards. Use gloves, rubber boots, and protective clothing to avoid direct contact with contaminated water.

Water Removal: Use a wet/dry vacuum, submersible pump, or a mop and bucket to remove standing water from the basement. Dispose of any damaged items that cannot be salvaged.

Cleaning and Disinfection: Thoroughly clean and disinfect the affected areas using a mixture of water and bleach. Ensure the basement is well-ventilated to hasten drying and to prevent mold growth.

Professional Plumbing Solutions

Professional plumbers can provide a range of solutions to address and prevent basement drain backups effectively. Some of these include:

Sump Pump Installation

A sump pump is a vital component in preventing basement flooding. Installed in a sump pit, it automatically pumps water out of the basement when levels rise during heavy rainfall. Ensure regular maintenance to keep the sump pump operational and avoid a premature sump pump replacement.

Backwater Valve Installation

A backwater valve, also known as a backflow preventer, is designed to stop sewage from flowing back into your home during heavy rain. This can be a crucial addition to your drainage system, especially for homes prone to sewer backups.

Drainage System Inspection and Repair

Regular inspection and maintenance of your home’s drainage system can help identify potential issues before they become serious. Professionals can unclog drains, repair damaged pipes, and ensure the system is free of obstructions like tree roots.

a french drain installation to help prevent basement drain backups.

A French drain is a trench filled with gravel or rock containing a perforated pipe that redirects surface and groundwater away from the home. This can be particularly useful for properties prone to heavy rainfall.

Preventive Landscaping and Exterior Solutions

Proper landscaping and exterior modifications play a crucial role in preventing basement drain backups. Here are effective strategies:

Grading and Yard Slope

Ensure that your yard slopes away from the foundation to direct water away from your home. Re-grading the yard can prevent water from pooling around your basement walls.

Extending Downspout Lengths

Extend the length of downspouts to channel water farther away from the foundation. This simple modification can significantly reduce the risk of basement drain backups.

Installing French Drains

A French drain is a trench filled with gravel or rock containing a perforated pipe that redirects surface and groundwater away from the home. A professionally installed French drain is particularly useful for properties prone to heavy rainfall.

Regular Maintenance Routines

Consistent maintenance routines can help prevent basement drain backups by ensuring your systems remain functional and efficient. Important tasks include:

Gutter and Downspout Cleaning

Regularly clean gutters and downspouts to remove leaves, debris, and other obstructions. This prevents water from overflowing and pooling around your home’s foundation.

Inspecting Foundation for Cracks

Inspect the foundation walls for any cracks and seal them promptly. Use waterproof coatings or professional foundation repair services to prevent water infiltration.

Sewer Line Maintenance

Schedule regular camera inspections and cleaning of your sewer lines. This can help identify and address obstructions, such as tree roots, before they cause significant problems.

Insurance Considerations for Basement Flood Damage

Homeowners should also consider insurance options to cover potential basement flood damage. Standard policies may not include flood coverage, necessitating additional policies:

Flood Insurance: Investigate adding flood insurance to protect against water damage from natural disasters.

Sewer Backup Endorsement: Consider a sewer backup endorsement to cover damages caused by sewer or drain backups.

To Sum It Up

Effective solutions for basement drain backups caused by heavy rain require a combination of professional plumbing services, preventive landscaping measures, and regular maintenance routines. By understanding the underlying causes and taking proactive steps, homeowners can protect their basements from water damage, maintaining a safe and dry living space. Additionally, exploring insurance options can provide financial protection against unforeseen incidents. Implementing these strategies will ensure long term peace of mind and the preservation of your home’s structural integrity.

DIY Water Heater Installation: A Detailed How-To Guide

DIY Water Heater Installation

Installing a water heater might seem like an overwhelming task, but with the right guidance, you can confidently tackle this project on your own.

This detailed DIY guide will walk you through every step of the process, ensuring that you have all the information you need to successfully install your new water heater.

From selecting the appropriate unit for your needs to the final installation steps, we’ve got you covered.

Understanding Your Water Heating Needs

Before getting into the technical aspects of water heater installation, it’s crucial to understand your household’s specific water heating requirements.

Consider factors such as the size of your home, the number of people living in it, and your daily hot water usage.

Identifying these needs will help you make an informed decision when selecting the right water heater unit.

Selecting the Right Water Heater Unit for Your Home

Choosing the correct water heater is paramount to ensure convenience and efficiency.

Start by determining whether a tankless or traditional tank-style water heater suits your needs best. Tankless water heaters provide an endless supply of hot water and are more energy-efficient but come at a higher initial cost.

On the other hand, tank-style water heaters are more affordable upfront and are suitable for households with lower to moderate hot water usage.

Additionally, you must decide between electric, gas, or solar-powered water heaters. Each type has its own set of advantages and drawbacks:

  • Electric water heaters: Easy to install and maintain, but may have higher energy costs compared to gas models.
  • Gas water heaters: Typically less expensive to operate, but require proper ventilation and can be more complex to install.

Consider energy efficiency ratings, warranty periods, and the capacity of the water heater before making your final decision. Speaking with a professional might be beneficial to ensure you select the optimal unit for your household. In some cases you might have to have an electric or gas water heater, such as cases in a condominium that strictly runs on electricity.

Gathering the Necessary Tools and Materials

Before initiating the installation process, ensure you have all the required tools and materials on hand. This can prevent unnecessary interruptions and ensure a smoother installation experience.

Key items you’ll need include:

  • Pipe Wrenches
  • Adjustable Wrenches
  • Screwdrivers
  • Plumber’s Tape
  • Pipe Cutter
  • Measuring Tape
  • Level
  • Safety Glasses and Gloves
  • Bucket
  • Hacksaw (if dealing with metal pipes)

Having these tools readily available will make the installation process more efficient and less stressful.

plumbing tools needed for diy water heater installation.

Before initiating the installation process, ensure you have all the required tools and materials on hand.

Preparing for Installation

Preparation is a key element in the successful installation of a water heater. Begin by turning off the water supply and gas or electricity to the existing water heater. Drain the old water heater tank by attaching a garden hose to the drain valve and directing the water to a suitable drainage location.

If you’re replacing an old water heater, remove it once it is completely drained. Disconnect all water and power lines with appropriate tools and ensure the area is clear of any debris or obstacles. It’s crucial to make sure the new water heater will have adequate space and proper access for maintenance tasks.

Installing the New Water Heater

With the old water heater removed and the area prepped, you can now move forward with the installation of your new unit. Follow these detailed steps:

Positioning the New Unit

Carefully place the new water heater in the allocated space. Ensure it stands level and stable. Use a level to verify proper positioning.

Connect Water Supply Lines

Use flexible water connectors to join the cold and hot water supply lines to the corresponding inlet and outlet ports on the water heater. Apply plumber’s tape to threaded connections to ensure a tight, leak-free seal. Secure the lines with adjustable wrenches, being careful not to overtighten.

Connect Gas or Electrical Supply

Gas Water Heater: If you have a gas water heater, connect the gas line using appropriate fittings and ensure proper ventilation for safety. Check for any gas leaks using a mixture of soap and water applied to the gas line and connections.

Electric Water Heater: For electric models, connect the electrical wiring to the water heater. Ensure all connections are made according to the manufacturer’s instructions and local electrical codes. If unsure, consider hiring a licensed electrician to complete this step.

Fill the Tank

Open the main water supply valve and allow the tank to fill with water. Open a hot water faucet to let air escape from the system. Once the tank is full and the water flows smoothly from the faucet, turn it off.

Power On

For electric water heaters, switch on the power at the electrical panel. For gas models, relight the pilot light or follow the manufacturer’s instructions to ignite the burner. Monitor the water heater to ensure it functions correctly, and check for any leaks or issues.

Performing a Test Run

Once the installation is complete, it’s essential to perform a thorough test run of your new water heater. Turn on several hot water faucets in your home and verify that the water heats up to the desired temperature. Inspect all connections for leaks and ensure the unit operates efficiently.

During this phase, adjust the water temperature settings if necessary, and familiarize yourself with the operation and maintenance guidelines provided by the manufacturer.

Ensuring Safety and Compliance

As with any home improvement project, safety is a paramount concern during water heater installation. Adhere to all safety guidelines and codes, including proper ventilation, secure gas or electrical connections, and adequate clearance around the unit. This is vital for the long-term safety and functionality of your water heater.

It’s also essential to register your new water heater with the manufacturer to activate the warranty. Keep all paperwork and receipts in a safe place for future reference.

 a water heater anode rod.

Check this component every few years and replace it if it’s significantly corroded to prevent tank rust.

Maintenance Tips for Longevity

Regular maintenance is key to prolonging the lifespan and efficiency of your water heater. Here are some essential tips:

  • Inspect the anode rod: Check this component every few years and replace it if it’s significantly corroded to prevent tank rust.
  • Check for leaks: Regularly inspect all connections and valves for any signs of leakage.
  • Test the pressure relief valve: Ensure this safety feature is functioning properly by lifting the valve handle and allowing some water to eject.

Adhering to these maintenance practices can help you avoid costly repairs and ensure your water heater runs efficiently for many years.

Troubleshooting Common Issues

Even with proper installation and maintenance, you may encounter issues with your water heater. Here are some common problems and their potential solutions:

  • No Hot Water: For electric heaters, check the circuit breaker or fuse box. For gas models, ensure the pilot light is lit. Verify that the unit’s thermostat is set to the appropriate temperature.
  • Inadequate Hot Water: Consider if the unit’s capacity meets your household needs. Check the thermostat settings and ensure the tank is free of sediment buildup.
  • Strange Noises: Sediment buildup in the tank can cause popping or rumbling sounds. Flushing the tank may resolve this issue.

If problems persist, check out the manufacturer’s manual or seek advice from a nearby plumber.

In Summary

Installing a water heater yourself can be a gratifying experience, providing both cost savings and a sense of accomplishment. By following the steps outlined in this detailed guide, you can approach your DIY water heater installation with confidence and ensure a successful outcome. Remember to prioritize safety, adhere to local codes, and perform regular maintenance to enjoy a reliable supply of hot water for years to come.