Backflow is a serious plumbing problem that is not talked about often enough. Unlike most plumbing issues in your home, this particular problem is not always accompanied by physical damage to your plumbing.
In other words, your plumbing may look perfectly fine while backflow is going on inside the system, says Century 21 Northstar experts. This is why backflow issues go on for a long time without detection. What is plumbing backflow, what are the causes, and how can you prevent it?
What is plumbing backflow?
Plumbing systems are designed to work a certain way. When the plumbing functions correctly, the water inside the pipes flows in only one direction. But sometimes problems happen, causing the water to reverse direction and creating a hazardous problem known as backflow.
Backflow introduces contaminated water into your fresh water supply. Often, this problem is not apparent because the color, taste, and smell do not change. What causes backflow, and what are the signs that backflow is happening in your plumbing system?
Causes and signs of plumbing backflow
Backflow happens because of Back Siphonage and Back Pressure.
Back Siphonage
Back siphonage is caused by sudden changes in water supply pressure. This pressure drop creates a vacuum inside the line. If the fall in water pressure is high enough, it will draw contaminated water from your drainage pipes into the freshwater lines.
Back siphonage can occur following a break in your main water line or a drop in water pressure from the municipal supply. Firefighting activities may remove too much water out of the system too fast, causing a massive drop in pressure inside the water lines.
Back Pressure
Back pressure originates from the downstream section of your plumbing. Appliances can place a demand on the water supply beyond what it can meet. Pressure imbalances from the shortfall between demand and supply can result in backflow.
The water pressure demands of boilers, water heaters, pumps, power washers, and irrigation systems may exceed the water supply. This can overload the fresh water supply line, leading to contaminated water flowing into the pipes.
What are the signs that you may have backflow issues in your plumbing system?
If your water has a grayish, pinkish, yellowish, or brownish hue, you may have backflow problems.
Strange odors in your home’s water supply, especially the smell of sulfur, may be due to backflow.
The presence of small particles inside your water could be because of backflow.
If your home has experienced or is experiencing a dip in water pressure, you need to check for backflow issues.
If you have appliances that need high water pressure, you should have your plumbing checked for backflow.
If there has been recent firefighting activity around your home, you may have backflow problems.
How to prevent plumbing backflow
By using one or a combination of the following methods, you can prevent backflow in your plumbing.
Air Gaps
This is an unblocked vertical space between a water supply outlet and the flood level of the receiving fixture. The physical separation between the two sides ensures no risk of contaminated water siphoning from one side into the clean water supply. Air gaps are the most basic type of backflow prevention. Air gaps already exist in some of your plumbing’s features, such as sinks and dishwashers.
Hose Bib Backflow Preventer
This protects individual plumbing fixtures from backflow, such as outdoor faucets. A hose bib backflow preventer is a simple device that screws onto the hose bib. It contains a vacuum breaker, which allows water to flow out of the hose during normal operation. In case of sudden pressure reversal, the vacuum breaker opens and vents to the atmosphere, preventing water reversal inside the hose bib.
Check Valves
This is a one-way valve that keeps water flowing in one direction. It closes if the water tries to flow backward due to pressure changes or other problems. There are different types of check valves. Most are useful for either backflow caused by back pressure or back siphonage, but some check valves are effective for both. Check valves can be used with heating systems, water supply lines, and most appliances in the home.
Vacuum Breakers
These are installed on hose bibs, faucets, and spigots to prevent back siphonage. They admit air into the system if a vacuum forms inside the line. There are two main types of vacuum breakers: atmospheric vacuum breakers, which are suitable for low-risk situations, and pressure vacuum breakers, which are for more robust applications like irrigation systems.
Does your home have a backflow problem? The only way to know is to have a professional plumber test your water supply and plumbing system. An experienced plumber can also guide you on the best ways to solve the backflow problems in your home.
Plumbing emergencies are problems inside your home that can threaten your health, safety, or belongings, says Archstone Management. These problems can make some plumbing fixtures inaccessible, causing your home to become temporarily unlivable.
Examples of plumbing problems that are considered plumbing emergencies include:
Burst pipes: Because of the risk of flooding, water damage, and structural compromise.
Sewage backup: Because it poses a major health risk and can cut off access to the toilet.
Clogged drains: They can cut access to the toilet or bathroom and also cause flooding.
Damaged water heater: Because it can terminate a household’s supply of hot water.
Sump pump failure: If you are wondering why sump pump failure is listed as one of the plumbing emergencies that can happen in your home, it is probably because you do not fully appreciate the vital role played by your sump pump as the home’s last line of defense against basement flooding.
The critical role of a sump pump
A sump pump is an indispensable equipment for homes where flooding is a constant threat. Although they are not the only flood prevention measure you can employ in your home, sump pumps have the unique quality of being deployable right inside your house.
Sump pumps are essential for maintaining a dry and safe living space. They help prevent flooding and preserve the indoor air quality of your home and its market value. One of the best things about a sump pump is that it can operate without supervision.
This is because a sump pump can power on automatically each time it detects water inside the sump basin and also power off after it has removed the water. This eliminates the need to constantly monitor your home for signs of flooding and manually switch on the sump pump.
Your sump pump can be likened to a watchdog. But instead of looking out for human intruders, it protects your home from flooding and water damage. This is why when a sump pump fails, it can expose your home to disastrous consequences on many levels.
Effects of sump pump failure on your home
The primary effects of sump pump failure are:
Flooding
Flooding alters the nature of your home as a safe living space. It destroys comfort and safety and may even stop you from using some of the vital features of your home. Flooding can make your home unlivable.
Water damage
The physical structures of a building and the belongings inside it are at risk when the home is flooded. Fixing damaged walls, ceilings, and flooring is expensive, and personal belongings may be irreplaceable.
Structural compromise
A poorly maintained or failed sump pump can compromise the integrity of your building’s key structures. Frequent water seepage into the foundation often results from problems with the sump pump.
Poor indoor air quality
Flooding exposes your family to a higher risk of respiratory conditions and illnesses. This is because water will seep into the walls and encourage mold growth. Mold spores impair your home’s indoor air quality.
Lower property value
Ultimately, these problems can cause the value of your property to fall. Buyers do not want to buy a home with a history of flooding. The presence of mold and structural issues will damage the value of your property.
Your sump pump may fail due to a power outage. If this happens during a storm, the possibility that your home will be flooded is very high. Installing a battery-powered sump pump system will save you in these circumstances.
How to prevent sump pump failure
Why does a sump pump fail? If you can identify the causes of sump pump failure and create strategies for preventing them, you can protect your home from it.
Regular maintenance
Issues like a stuck float switch or a clogged discharge line can stop your sump pump from working properly. However, these problems can be solved or prevented by maintaining the sump pump on a schedule.
Test and inspect the sump pump
You should test your sump pump at least once a month and certainly at the start of each season. Before this step, you may want to inspect the entire sump pump system first.
Install a backup system
Your sump pump may fail due to a power outage. If this happens during a storm, the possibility that your home will be flooded is very high. Installing a battery-powered sump pump system will save you in these circumstances.
Upgrade your sump pump system
If the sump pump is not installed properly, is too small for your home, or the sump basin is not big enough, it will not be effective. Fixing these problems lowers the risk of sump pump failure.
Lastly, you need a professional plumber to thoroughly inspect and service the sump pump system at least once a year. This will help you detect budding issues with the sump pump and fix them before they result in a plumbing emergency in your home.
Plumbing fixtures are crucial in every home or business, ensuring water flows where needed. In hot climates, these fixtures require extra attention to prevent damage from heat, dryness, and temperature fluctuations. Proper storage and maintenance practices can extend their lifespan and maintain functionality. This guide provides detailed steps and insights for storing and caring for plumbing fixtures in hot climates.
Understanding the Challenges of Hot Climates
Hot climates pose specific risks to plumbing fixtures. Intense heat can warp certain materials, cause rubber seals to dry out, and lead to premature corrosion. Humidity fluctuations can exacerbate these issues by promoting rust or mold growth. Getting professional help from a plumber to recognize these challenges could be the first step to protecting your plumbing fixtures.
Choosing the Right Storage Location
Selecting a proper storage area is vital in hot climates. Aim for a cool and shaded location away from direct sunlight. Garages and outdoor sheds can be used, but they should have adequate ventilation to avoid excessive heat buildup. Choose indoor spaces with climate control to stabilize temperatures and humidity if possible.
Preparing Fixtures for Storage
Before storing plumbing fixtures, ensure they are clean and dry. Residual water can lead to rust, mold, or bacterial growth, especially in metal components. Use a mild cleaning solution to remove dirt and deposits, and dry fixtures thoroughly with a soft cloth. Disassemble fixtures with moving parts carefully to reduce strain on joints and seals during storage.
Protecting Fixtures from Heat and Humidity
Heat-resistant covers or wraps can provide extra protection for plumbing fixtures. Materials such as insulated foam or heavy-duty plastic are excellent options. These coverings shield fixtures from heat exposure and help maintain a stable environment. Consider using silica gel packets or dehumidifiers to absorb excess moisture in areas with high humidity.
Caring for Plumbing Fixtures
Rubber seals, gaskets, and plastic parts are particularly vulnerable in hot climates. High temperatures can cause them to dry out, crack, or lose elasticity. Apply a silicone-based lubricant to rubber components to keep them supple and prevent drying. Store plastic parts in airtight containers to protect them from heat and dust.
Preventing Corrosion in Metal Fixtures
Metal plumbing fixtures, such as faucets and pipes, are prone to corrosion when exposed to extreme heat and humidity. To combat this, apply a thin layer of rust-preventive oil or spray to metal surfaces before storage. Ensure fixtures are stored in a dry environment to reduce exposure to moisture, which accelerates rust formation.
Caring for plumbing fixtures means preventing corrosion.
Inspecting Fixtures Regularly
Even when stored correctly, plumbing fixtures should be checked periodically for signs of damage. Look for cracks, warping, or discoloration in plastic parts, and inspect metal components for rust or corrosion. Rubber seals should remain soft and pliable, not brittle or cracked. Regular inspections allow you to address potential issues before they worsen.
Handling Plumbing Fixtures During Moves
Hot climates can make moving plumbing fixtures challenging. Heat and rough handling can damage delicate components. Partnering with professional and reliable movers ensures your fixtures are transported safely. As a trusted name in professional moving services, Good Neighbors Moving Company specializes in carefully transporting items, including fragile plumbing fixtures. Their experienced team understands the importance of secure packaging, careful loading, and safe delivery. By partnering with them, you can ensure that your plumbing fixtures arrive at your new location intact and ready for installation, saving you time, stress, and potential repair costs.
Long-Term Maintenance Tips for Hot Climates
Regular maintenance is essential for caring for plumbing fixtures exposed to hot climates. Clean them frequently to remove mineral buildup, which is more common in areas with hard water. Inspect and replace rubber seals periodically, as heat can cause them to deteriorate over time. For outdoor fixtures, use weather-resistant covers to shield them from the elements.
Reinstalling Stored Fixtures
When it’s time to reinstall stored plumbing fixtures, clean them thoroughly to remove any dust or residue accumulated during storage. For metal fixtures, wipe off any rust-preventive oils. Reassemble all components carefully, ensuring seals and gaskets are securely in place—inspect fixtures for leaks and proper functionality before full use.
The Role of Water Quality in Hot Climate Maintenance
Water quality plays a significant role in the longevity of plumbing fixtures, especially in hot climates. High mineral content, common in areas with hard water, can lead to scaling and clogging over time. These issues are exacerbated in heat, as mineral deposits tend to harden more quickly. To mitigate this, consider installing a water softener or filtration system to reduce the mineral content in your water. This preventive step protects your plumbing fixtures and ensures smoother water flow and better performance over time.
High mineral content, common in areas with hard water, can lead to scaling and clogging over time.
Eco-Friendly Storage and Care Solutions
Incorporating eco-friendly solutions into the care of plumbing fixtures is another forward-thinking approach. To minimize environmental impact, opt for biodegradable cleaning agents and rust-preventive sprays. For storage, recycled or sustainable materials can be used for protective covers and containers. Solar-powered dehumidifiers are another innovative option, offering a green way to control humidity in storage areas. These practices maintain your fixtures effectively and align with environmentally conscious values, creating a win-win for homeowners and the planet.
Final Thoughts
Caring for plumbing fixtures in hot climates requires proactive measures to protect them from heat, humidity, and wear. By selecting the right storage solutions, using protective materials, and committing to regular maintenance, you can preserve the quality and functionality of your fixtures for years to come. Whether you’re storing items temporarily or preparing for a move, these steps ensure your plumbing fixtures remain in excellent condition.
Repiping your home is not an upgrade any homeowner is excited to do in their home, says Louise Beck Properties. While you may understand the critical role played by your water pipes, you typically don’t like spending all that money to replace them.
This is why most homeowners don’t think of repiping their house until problems in their plumbing system force them to do it. Most homeowners only decide to repipe their property after they have had a plumbing disaster.
But like all the major systems in your home, your water pipes also have an expiration date. Pipes’ lifespan depends on the pipe material, the chemical composition of your water, how well you maintain the pipes, and a host of other factors.
Generally speaking, galvanized pipes last 20-50 years. Brass pipes have a longer lifespan of 40–70 years. Copper pipes have a life expectancy of 50+ years, and cast iron has the longest lifespan of any metal water pipe (75 -100 years). Plastic pipes last indefinitely.
If you are reading this, you are probably on the verge of repiping your home but also trying to familiarize yourself with the process (perhaps to avoid biting off more than you can chew). If this is true, this post will explain what you should expect when repiping your home.
What to expect when repiping your home
How long will it take to repipe your home?
This depends on whether you are repiping the entire house or just a section. Whole-house repiping may take up to a week to complete, but partial repiping can be completed in as little as one day. The plumber needs to assess the work to say how long it will take.
How will the project affect your family?
If you are repiping the entire home, it is best to move your family away from the house during the duration of the project. Due to the highly disruptive nature of repiping a house, your family will be without many of the comforts they are used to. Also, to give your plumber the space he needs to do the work properly, it is best if you vacate your home.
How invasive is this project?
What are the specific ways that repiping your home will disrupt your family’s day-to-day life?
No running water: The home may be without running water for a few hours, the entire day, or more than two days. It depends on the scope of the work. When you work with an experienced plumber, it is possible to have them shut off the water during working hours but restore the service before the end of each day.
Damage to walls, flooring, and ceilings: To access your old pipes, the workers must cut into your walls, flooring, and ceiling. To get at the walls or flooring, they may have to move appliances and furniture around. While you can expect the plumber to use drop-cloths to protect your home and belongings, your home will still be in disarray for the period.
Noise and dust: Like any construction site, you should expect dust and noise during this project. Earplugs may help you escape the worst noise, and draping floors or furniture with plastic sheeting can shield them from dust. However, there is no way to completely escape the inconvenience while your home is repiped.
No access to rooms: Depending on how the pipes in your home are routed, you may lose access to your bedroom, bathroom, or kitchen. Privacy will be a problem if you decide to stay at home during the project. You may also not be able to prepare meals in the kitchen.
Expect to repair your walls, ceilings, and flooring
After repiping is completed, you have to fix your damaged walls, floors, and ceiling. This added cost is separate from the actual cost of repiping your home. Of course, a competent contractor will include this additional cost in their estimates, but it is essential to know it from the start.
Getting your home ready for repiping
Repiping your home does not have to be excessively disruptive if you plan and prepare for it. What steps should you take to reduce the impact of this project on your family? Planning is the best way to minimize the effect of repiping.
Once your plumber provides a timeline for the work, you can plan it according to your schedules.
Better still, you can plan to be away from home during this period.
You can also move into one of the rooms that will not be affected or arrange for the work to be done in such a way as to let you always have one room available for your family.
Lastly, when repiping your home, you need patience. But more than anything else, you need a professional plumber who can sit down with you to work out a plan that will help to reduce the project’s effect on your family and finances.
When a plumbing emergency occurs in your home, and you call a 24-hour plumber to fix the problem, there is usually a waiting period between the call and when they arrive.
What you do during this waiting period will influence the impact of the plumbing emergency on your home. Your response within the first few minutes of discovering a plumbing problem in your home can make more difference, says RedStone Management.
This post explains the steps you should take during a plumbing emergency. They will help you minimize the damage to your home and the cost of repairs. They can also make your plumber’s life easier and the insurance process claims quicker.
What to do while waiting for a 24-hour plumber to arrive
Do the first two steps as soon as you discover the plumbing problem. The other steps should be done after you have called the emergency plumbing service.
Shut the water supply
Stop the problem from the source; turn off the water supply to the damaged pipe, plumbing fixture, or your entire home. If the affected pipe or fixture has a dedicated shutoff valve, close the valve to turn off the water supply. If it doesn’t, turn off the water supply at the main water shutoff valve. You should find this in the basement, crawlspace, garage, utility room, or outside on the street-facing side of your house.
Turn off the electricity
If there is any risk that the released water will come into contact with an electrical appliance or power outlet in your home, you want to turn off the electricity supply. If the water is already in contact with electricity, do not step into it. If you are not sure, it is better to err on the side of caution. And wait until the plumber arrives.
Drain faucets and water lines
Even after turning off the water at the main shutoff valve, water is still inside your water lines. This water can flow to the location of the damaged plumbing and cause more damage to your home. To prevent this, flush all toilets (if the plumbing emergency is not an overflowing toilet) and open all the faucets inside the house. That will get rid of any water inside the pipes.
Move furniture to a dry area
Any item that can be damaged by water should be moved to a safe place inside your home if it is near the location of the damaged pipe or fixture. All wet items that are salvageable should be taken outside to air and dry. Delaying to do this will make it harder to salvage those items, and your insurance payout may not cover replacing your damaged belongings.
Mop up any standing water
The next step is to remove any standing water on your flooring. The longer you let it stay, the deeper it will soak into the flooring. But if you remove it quickly, you may be able to avoid the expense of replacing your flooring. You can remove the water with a wet vacuum or a mop and bucket. If parts of the drywall are affected, open your door to improve air circulation. Depending on the amount of damage, you may need to hire a professional to dry your home.
Take photos and videos of the damage
Walk through the house with a smartphone and make a video of the area around the damaged pipe or fixture. Make sure to capture the cause of the problem and the damage to your walls, flooring, and belongings. For clarity, it is a good idea to add some narration to the video. The videos and photos serve as your records and will be handy when making insurance claims.
Take preventive action
After your emergency plumber has come and gone, you may want to take steps to prevent a recurrence of the problem. As you probably learned from this experience, it is far easier and cheaper to prevent a plumbing emergency in your home than to fix the damage caused by a plumbing emergency. How can you avoid similar problems in the future?
Inspect your plumbing every month or at the start of every season. You can do this yourself. Also, you will need a professional plumber to thoroughly inspect your plumbing system yearly.
Fix all minor problems with the plumbing at once. Minor issues progress to the major problems that lead to plumbing emergencies in your home.
Finally, you will need a reliable 24-hour plumber. The best time to find an emergency plumber is before a plumbing emergency in your home. Having an emergency plumber (that you have already vetted) on speed dial can save you time and money during a plumbing emergency.
For many Chicago businesses, water plays a vital role in their day-to-day operations—not as an essential input but as a major byproduct of their industrial processes. As a result, these businesses also generate large quantities of wastewater daily, explains Peabody Residential team.
However, the wastewater flowing from these facilities differs from that from homes. It may contain heavy metals, synthetic inorganic products, chemicals, particulate matter, and FOG (fats, oils, and grease).
On the other hand, industrial sewer lines handle wastewater similar to those found in homes. They are also vulnerable to clogs and leakages. In fact, because of the stresses they are subjected to, industrial sewer lines may even be more prone to damage.
Additionally, when problems happen, their impact is more far-reaching. Along with the obvious effect on business operations and profits, there is a higher risk of environmental damage. These facts highlight the need for a business to maintain its industrial sewer systems regularly.
Importance of regular industrial sewer maintenance
What is the correct schedule for maintaining an industrial sewer system? What steps should be taken to keep the sewer line flowing at all times while prolonging its life? What are the practical benefits of regular industrial sewer line maintenance for a business?
Why should you maintain your industrial sewer system?
Regular sewer system maintenance helps to cut costs
Adopting a proactive stance toward sewer line maintenance helps businesses save costs. By detecting problems in their early stages, preventive maintenance works to stop rather than solve problems. It gives the business some control over what happens inside its sewer line, allowing it to avoid major issues and high repair costs.
Enhances operational efficiencies
Problems in an industrial sewer line can upset the entire production process through unsafe working conditions, damage to buildings or equipment, dampening staff morale, exposure to harmful materials and germs, and operational downtime. These problems can be avoided if the sewer line is maintained professionally.
Ensure regulatory compliance
Neglecting an industrial sewer line can cost a business its operational license. Regulators may shut down a business if they adjudge that its sewer lines are hazardous to human life and nature. By keeping the sewer line healthy and flowing, the business protects the environment and enhances its reputation.
Prolong the lifespan of the sewer line
A business that adequately maintains its industrial sewer line is doing itself a service. Well-maintained sewer lines last longer and are less prone to clogs/blockages. This results in overall lower maintenance costs. The organization can also derive more value from its sewer line for much longer.
Hydro jetting an industrial sewer line also helps to clear out debris and leave the surface smooth. It prevents further buildup.
How often should an industrial sewer system be cleaned and inspected?
That depends on:
The type of wastewater: If the wastewater has a lot of organic solids with high viscosity, there is a greater risk of sedimentation inside the pipes. That will, in turn, require the sewer lines to be cleaned more frequently. The location of the facility may also play a role.
The flow rates: For most industrial sewage systems, flow rates must exceed a specific limit to prevent buildup within the pipes. If wastewater flows through the line at a slower rate, the pipe must be cleaned more frequently.
The pipe materials:The type of pipe material affects the frequency of sewer line maintenance because different materials have different friction levels. If friction is high, the flow rate will be affected, and the sewer line must be cleaned more often.
How to maintain an industrial sewer line
There are three key components to industrial sewer system maintenance:
Professional inspections: Given the complex nature of industrial sewer systems and the potential add-on effects of problems in the system, it is always an advantage to stay ahead of any issues in the sewer line. You can do this by conducting a sewer scope video inspection at a specific time in the year. It helps to catch any budding issues before they explode.
Regular inspections: To remove the buildup that is constantly happening inside the sewer line, it is essential to clean the system periodically. Snaking the line will dislodge any debris or tree roots inside the pipes. Hydro jetting an industrial sewer line also helps to clear out debris and leave the surface smooth. It prevents further buildup.
Hire a professional commercial plumber: Find an experienced plumber specializing in industrial sewer line maintenance. A competent plumber can offer valuable advice that will save you money. An experienced commercial plumber is a valuable ally for helping your business navigate complex city regulations.
What should be your first step when creating an effective maintenance program for your industrial sewer system? We can help you answer that question.
Detecting a shower leak behind walls can be challenging, but understanding the signs can help you identify the problem early. Common indicators include water stains on the ceiling or walls, peeling paint or wallpaper, mold or mildew growth, and a musty odor. Additionally, you may notice an increase in your water bill or a decrease in water pressure. Being aware of these signs can help you address the issue before it causes significant damage to your home.
Water stains on the ceiling or walls are often the first visible signs of a leak. These stains may appear as discolored patches, often brown or yellow, and can grow over time if the leak is not addressed. Peeling paint or wallpaper is another common indicator of moisture behind walls. As water seeps into the wall, it can cause the adhesive holding the paint or wallpaper to weaken, leading to bubbling, peeling, or flaking.
Mold and mildew growth are serious concerns when it comes to hidden leaks. Mold thrives in damp, dark environments, and a leak behind your shower walls provides the perfect breeding ground. You may notice black, green, or white patches of mold on the walls, ceiling, or even the floor. Mold can cause health issues, including respiratory problems and allergies, so it’s crucial to address any mold growth promptly.
A musty odor is another telltale sign of a hidden leak. This smell is caused by mold and mildew growth and can be particularly noticeable in enclosed spaces like bathrooms. If you detect a persistent musty smell, it’s essential to investigate further to identify the source of the moisture.
An increase in your water bill can also indicate a hidden leak. If you notice a sudden spike in your water usage without a corresponding increase in your daily activities, it may be due to a leak behind your shower walls. Similarly, a decrease in water pressure can be a sign of a leak, as water escapes from the pipes before reaching your showerhead or faucet.
Using Moisture Meters and Infrared Cameras to Detect Leaks
One of the most effective ways to detect a shower leak behind walls is by using a moisture meter or an infrared camera. Moisture meters can measure the moisture content in your walls, helping you pinpoint the exact location of the leak. Infrared cameras, on the other hand, can detect temperature differences in your walls, indicating areas where water may be present. Both tools can be invaluable in identifying hidden leaks and preventing further damage.
Moisture meters come in various types, including pin-type and pinless models. Pin-type moisture meters use two metal probes that are inserted into the wall to measure the electrical resistance between them. This resistance changes with the moisture content, allowing you to determine the level of dampness in the wall. Pinless moisture meters, on the other hand, use electromagnetic sensors to detect moisture without penetrating the wall surface. Both types of moisture meters can be effective, but pinless models are less invasive and may be preferable for detecting leaks behind finished walls.
Infrared cameras, also known as thermal imaging cameras, work by detecting infrared radiation emitted by objects. When used to inspect walls, these cameras can reveal temperature differences that indicate the presence of moisture. Wet areas tend to be cooler than dry areas, so a leak behind your shower walls will appear as a distinct cold spot on the camera’s display. Infrared cameras can be particularly useful for detecting leaks that are not yet visible to the naked eye, allowing you to address the issue before it causes significant damage.
Both moisture meters and infrared cameras can be rented from hardware stores or purchased for home use. If you prefer, you can also hire a professional to perform a moisture inspection using these tools. A trained technician can accurately interpret the readings and provide recommendations for addressing any detected leaks.
Inspecting Plumbing Fixtures and Connections
Another crucial step in detecting a shower leak behind walls is inspecting your plumbing fixtures and connections. Check for any visible signs of wear or damage, such as corrosion, rust, or loose connections. Pay close attention to the areas where the showerhead, faucet, and pipes connect, as these are common sources of leaks. If you notice any issues, it may be necessary to replace or repair the damaged components to prevent further leakage.
Start by examining the showerhead and faucet for any signs of leaks or damage. Look for water dripping from the showerhead or faucet when they are turned off, as this can indicate a problem with the internal components. Additionally, check for any visible cracks or corrosion on the fixtures themselves. If you notice any issues, it may be necessary to replace the showerhead or faucet to prevent further leaks.
Next, inspect the connections between the showerhead, faucet, and pipes. Look for any signs of rust, corrosion, or mineral buildup, as these can weaken the connections and lead to leaks. Tighten any loose connections and replace any damaged or corroded components as needed. It’s also a good idea to check the caulking and grout around the shower fixtures, as gaps or cracks in these materials can allow water to seep behind the walls.
Don’t forget to inspect the plumbing pipes behind the shower wall if you have access to them. Look for any visible signs of leaks, such as water stains, dampness, or mold growth. Check the pipe joints and connections for any signs of wear or damage, and replace any damaged sections of pipe as needed. If you’re unsure about the condition of your plumbing, consider hiring a professional bathroom plumber to perform a thorough inspection.
If you notice a sudden spike in your water usage without a corresponding increase in your daily activities, it may be due to a leak behind your shower walls.
Removing Wall Panels and Tiles to Access the Leak
In some cases, it may be necessary to remove wall panels or tiles to access the leak and assess the extent of the damage. Carefully remove the affected area, taking care not to cause additional damage to the surrounding walls. Once you have exposed the leak, you can determine the best course of action for repairing it. This may involve replacing damaged pipes, sealing gaps, or applying waterproofing materials to prevent future leaks.
Before removing any wall panels or tiles, make sure to turn off the water supply to the shower to prevent further leakage. Use a utility knife or a grout saw to carefully cut through the grout or caulking around the tiles or panels. Gently pry the tiles or panels away from the wall using a putty knife or a flat pry bar, taking care not to damage the surrounding materials.
Once you have removed the tiles or panels, inspect the exposed area for signs of water damage. Look for dampness, mold growth, or discolored patches on the wall or insulation. If the damage is extensive, you may need to remove additional tiles or panels to fully assess the extent of the problem.
After identifying the source of the leak, determine the best method for repairing it. This may involve replacing damaged sections of pipe, sealing gaps or cracks with waterproof sealant, or applying a waterproof membrane to the affected area. If the damage is severe or if you’re unsure about the best course of action, consider calling a professional plumber for assistance.
Repairing Damaged Pipes and Sealing Leaks
Once you have identified the source of the leak, it’s essential to repair the damaged pipes and seal any leaks to prevent further water damage. Depending on the severity of the leak, you may need to replace sections of piping, apply pipe sealant, or use waterproof tape to secure connections. It’s crucial to ensure that all repairs are done correctly to avoid future leaks and potential damage to your home.
If the leak is caused by a damaged section of pipe, you will need to cut out the damaged portion and replace it with a new piece of pipe. Use a pipe cutter or a hacksaw to cut the damaged section, and clean the ends of the remaining pipe with sandpaper or a pipe cleaning tool. Apply pipe primer and cement to the ends of the new pipe and the existing pipe, and press them together to create a secure connection. Allow the cement to dry according to the manufacturer’s instructions before turning the water supply back on.
For smaller leaks or gaps, you can use pipe sealant or waterproof tape to create a watertight seal. Apply the sealant or tape according to the manufacturer’s instructions, making sure to cover the entire area of the leak. Allow the sealant to dry or the tape to adhere fully before testing the repair by turning the water supply back on and checking for any signs of leakage.
In some cases, it may be necessary to apply a waterproof membrane to the affected area to prevent future leaks. These membranes are typically made of rubber or other waterproof materials and can be applied directly to the wall or floor. Follow the manufacturer’s instructions for applying the membrane, making sure to cover the entire area of the leak and any surrounding damaged areas.
Reinstalling Wall Panels and Tiles
After repairing the leak, it’s time to reinstall the wall panels and tiles. Ensure that the area is completely dry before proceeding with the installation. Use waterproof adhesive and grout to secure the tiles and panels in place, and apply a waterproof sealant to the seams to prevent future leaks. Taking these precautions will help protect your walls from water damage and maintain the integrity of your bathroom.
Before reinstalling the tiles or panels, make sure the wall surface is clean and free of any debris or old adhesive. Use a putty knife or a scraper to remove any remaining grout or caulking from the edges of the tiles or panels. If you’re reinstalling tiles, apply a thin layer of waterproof adhesive to the back of each tile using a notched trowel, and press the tiles firmly into place on the wall. Use tile spacers to ensure even spacing between the tiles, and allow the adhesive to dry according to the manufacturer’s instructions.
Once the adhesive has dried, remove the tile spacers and apply grout to the gaps between the tiles using a grout float. Press the grout firmly into the gaps, making sure to fill them completely. Wipe away any excess grout with a damp sponge, and allow the grout to dry according to the manufacturer’s instructions. After the grout has dried, apply a waterproof sealant to the seams to prevent future leaks.
If you’re reinstalling wall panels, apply a thin layer of waterproof adhesive to the back of each panel and press them firmly into place on the wall. Use a level to ensure the panels are straight, and allow the adhesive to dry according to the manufacturer’s instructions. Once the adhesive has dried, apply a waterproof sealant to the seams between the panels to prevent future leaks.
Consider installing a waterproof membrane behind your shower walls to provide an extra layer of protection against leaks.
Preventing Future Shower Leaks
Preventing future shower leaks involves regular maintenance and inspections of your plumbing system. Check for signs of wear and damage periodically, and address any issues promptly to avoid costly repairs. Additionally, consider installing a waterproof membrane behind your shower walls to provide an extra layer of protection against leaks. By taking these preventative measures, you can help ensure the longevity and functionality of your bathroom.
Regularly inspect your shower fixtures, caulking, and grout for signs of wear or damage. Replace any damaged or deteriorating materials promptly to prevent water from seeping behind the walls. Additionally, check for any signs of mold or mildew growth, as these can indicate hidden leaks. If you notice any issues, address them promptly to prevent further damage.
Consider installing a waterproof membrane behind your shower walls during your next renovation or remodel. These membranes provide an additional layer of protection against leaks by creating a barrier between the wall and any water that may seep through the tiles or panels. Waterproof membranes are typically made of rubber or other waterproof materials and can be applied directly to the wall surface before installing tiles or panels.
Regularly maintain your plumbing system by checking for signs of wear or damage and addressing any issues promptly. This includes inspecting the pipes, connections, and fixtures for any signs of leaks or corrosion. If you’re unsure about the condition of your plumbing system, consider hiring a professional plumber to perform a thorough inspection and make any necessary repairs.
Contacting a Professional Plumber
While some shower leaks can be fixed with DIY methods, it’s always a good idea to consult a professional plumber for more complex issues. A licensed plumber can accurately diagnose the problem, recommend the best course of action, and ensure that all repairs are done correctly. Hiring a professional can save you time, money, and potential headaches in the long run, and provide peace of mind knowing that your plumbing system is in good hands.
Professional plumbers have the experience and expertise to handle a wide range of plumbing issues, including hidden leaks behind shower walls. They can use specialized tools, such as moisture meters and infrared cameras, to accurately detect the source of the leak and assess the extent of the damage. Additionally, they can recommend the most effective repair methods and ensure that all repairs are done to code.
When hiring a professional plumber, make sure to choose a licensed and insured contractor with a good reputation. Ask for references and check online reviews to ensure that the plumber has a history of providing quality service. Additionally, request a detailed estimate before any work begins, so you have a clear understanding of the costs involved.
While hiring a professional plumber may be more expensive than attempting a DIY repair, it can save you money in the long run by preventing further damage and ensuring that the repairs are done correctly. Additionally, a professional plumber can provide valuable advice on maintaining your plumbing system and preventing future leaks.
Understanding the Costs of Repairing Shower Leaks
Repairing shower leaks behind walls can vary in cost depending on the severity of the damage and the extent of the repairs needed. Minor leaks may only require simple fixes, such as tightening connections or applying sealant, which can be relatively inexpensive. However, more extensive damage, such as replacing pipes or wall panels, can be more costly. It’s essential to get a detailed estimate from a professional plumber to understand the potential costs and budget accordingly.
Minor repairs, such as tightening connections or applying sealant, can cost as little as $100 to $200. These simple fixes can often be done quickly and with minimal disruption to your home. However, if the leak has caused significant damage to the walls or flooring, the costs can increase significantly.
Replacing damaged sections of pipe can cost anywhere from $200 to $1,000 or more, depending on the extent of the damage and the type of piping used. If the leak has caused damage to the wall panels or tiles, you may also need to factor in the cost of removing and replacing these materials. The cost of replacing wall panels or tiles can range from $300 to $1,500 or more, depending on the size of the affected area and the type of materials used.
In some cases, extensive water damage may require additional repairs, such as replacing insulation, drywall, or flooring. These repairs can add several hundred to several thousand dollars to the total cost of the project. Additionally, if mold or mildew growth is present, you may need to hire a professional mold remediation company to address the issue, which can cost several hundred to several thousand dollars.
To get an accurate estimate of the costs involved in repairing a shower leak, it’s essential to contact a professional plumber. They can assess the extent of the damage, recommend the necessary repairs, and provide a detailed estimate of the costs. Additionally, they can help you understand any potential additional costs, such as mold remediation or structural repairs, that may be required.
A licensed plumber can accurately diagnose the problem, recommend the best course of action, and ensure that all repairs are done correctly.
Maintaining a Leak-Free Shower
Maintaining a leak-free shower involves regular inspections, prompt repairs, and preventative measures. By staying vigilant and addressing any issues as soon as they arise, you can help ensure the longevity and functionality of your shower. Additionally, investing in quality materials and professional installations can provide added protection against leaks and water damage. With proper care and maintenance, you can enjoy a leak-free shower for years to come.
Regularly inspect your shower fixtures, caulking, and grout for signs of wear or damage. Replace any damaged or deteriorating materials promptly to prevent water from seeping behind the walls. Additionally, check for any signs of mold or mildew growth, as these can indicate hidden leaks. If you notice any issues, address them promptly to prevent further damage.
Consider installing a waterproof membrane behind your shower walls during your next renovation or remodel. These membranes provide an additional layer of protection against leaks by creating a barrier between the wall and any water that may seep through the tiles or panels. Waterproof membranes are typically made of rubber or other waterproof materials and can be applied directly to the wall surface before installing tiles or panels.
Regularly maintain your plumbing system by checking for signs of wear or damage and addressing any issues promptly. This includes inspecting the pipes, connections, and fixtures for any signs of leaks or corrosion. If you’re unsure about the condition of your plumbing system, consider hiring a professional plumber to perform a thorough inspection and make any necessary repairs.
Investing in quality materials and professional installations can also help prevent future leaks. Choose high-quality fixtures, pipes, and waterproofing materials for your shower, and hire a professional plumber to ensure that the installation is done correctly. Proper installation and quality materials can provide added protection against leaks and water damage, helping to ensure the longevity and functionality of your shower.
By following these tips and staying vigilant, you can help maintain a leak-free shower and prevent costly repairs in the future. Regular inspections, prompt repairs, and preventative measures can go a long way in protecting your bathroom from water damage and ensuring that your shower remains in good working condition for years to come.
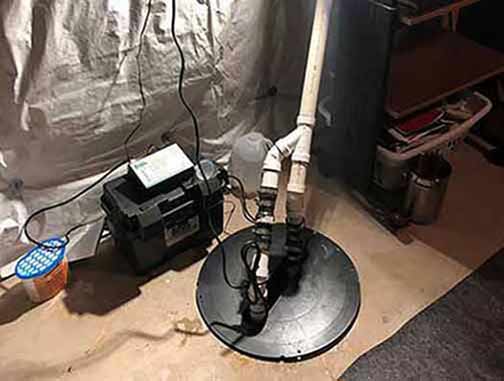
In the realm of home protection, few devices are as crucial as backup sump pumps. These unsung heroes play a pivotal role in safeguarding homes from water damage, particularly during heavy rains or flooding. While primary sump pumps are the first line of defense, backup sump pumps ensure continuous protection when the primary system fails. Here we get into the critical role of backup sump pumps, their operation, and their significance in flood prevention.
Understanding the Functionality of Backup Sump Pumps
Backup sump pumps are designed to activate when the primary sump pump either fails or is overwhelmed by excessive water. They are typically powered by batteries or water pressure, ensuring they can operate independently of the main power supply. This independence is crucial during power outages, which often accompany severe weather conditions. By automatically kicking in when needed, backup sump pumps provide an additional layer of security for homeowners.
How Backup Sump Pumps Complement Primary Sump Pumps
Primary sump pumps are effective at managing regular water levels, but they can become overwhelmed during heavy rainfall or flooding. Backup sump pumps complement these primary systems by taking over when the primary pump cannot keep up with the water influx. This dual-layer protection ensures that homes remain dry even in the most challenging conditions. Additionally, backup sump pumps can prevent the primary pump from burning out due to overuse, extending its lifespan.
Types of Backup Sump Pumps
There are several types of backup sump pumps, each with its own set of advantages. Battery-operated backup sump pumps are the most common, providing reliable performance during power outages. Water-powered backup sump pumps, on the other hand, use the home’s water supply to generate power, making them an excellent choice for homes with a consistent water source. Both types offer unique benefits, and the choice between them depends on the specific needs and circumstances of the homeowner.
Installation and Maintenance of Backup Sump Pumps
Proper installation and maintenance are key to the effectiveness of backup sump pumps. Professional installation ensures that the system is correctly integrated with the primary sump pump and that all components are functioning as intended. Regular maintenance, including battery checks and system tests, is essential to ensure the backup pump is ready to operate when needed. Homeowners should schedule routine inspections to identify and address any potential issues before they become significant problems.
The Significance of Backup Sump Pumps in Flood Prevention
Flooding can cause extensive damage to homes, leading to costly repairs and long-term structural issues. Backup sump pumps play a critical role in flood prevention by providing continuous protection against water intrusion. They help to keep basements and crawl spaces dry, preventing mold growth and preserving the integrity of the home’s foundation. In areas prone to heavy rainfall or flooding, backup sump pumps are an indispensable component of a comprehensive home protection strategy.
Backup sump pumps play a critical role in flood prevention by providing continuous protection against water intrusion.
Choosing the Right Backup Sump Pump for Your Home
Selecting the right backup sump pump involves considering several factors, including the size of the sump basin, the expected water volume, and the power source. Homeowners should speak with a professional plumber to determine the most suitable type and capacity for their specific needs. Additionally, it’s important to choose a reputable brand known for reliability and durability. Investing in a high-quality backup sump pump can provide peace of mind and long-term protection for the home.
Cost Considerations and Financial Benefits
While the initial cost of purchasing and installing a backup sump pump may seem significant, the long-term financial benefits far outweigh the expense. Preventing water damage can save homeowners thousands of dollars in repair costs and protect valuable belongings from destruction. Moreover, having a reliable backup sump pump installed can potentially lower home insurance premiums, as it reduces the risk of water-related claims. The financial advantages, combined with the enhanced protection, make backup sump pumps a wise investment for any homeowner.
Real-Life Examples of Backup Sump Pumps in Action
Many homeowners have experienced firsthand the lifesaving benefits of backup sump pumps. For instance, during a severe storm, one family’s primary sump pump failed due to a power outage. Fortunately, their battery-operated backup sump pump activated, preventing what could have been a disastrous flood in their basement. Another homeowner in a flood-prone area relied on a water-powered backup sump pump, which successfully kept their home dry during an unexpected deluge. These real-life examples highlight the importance of having a reliable backup system in place.
Environmental Impact of Backup Sump Pumps
While backup sump pumps are essential for home protection, it’s also important to consider their environmental impact. Battery-operated pumps require proper disposal of batteries to prevent environmental harm. Homeowners should follow local guidelines for battery disposal and consider using rechargeable batteries to reduce waste. Water-powered sump pumps, while eco-friendly in terms of energy use, can increase water consumption. Balancing the need for home protection with environmental responsibility is crucial for sustainable living.
Future Trends in Backup Sump Pump Technology
The technology behind backup sump pumps is continually evolving, with advancements aimed at improving efficiency and reliability. Smart sump pumps equipped with sensors and connectivity features are becoming more popular, allowing homeowners to monitor their systems remotely and receive alerts in case of malfunctions. Additionally, innovations in battery technology are leading to longer-lasting and more efficient power sources. As technology progresses, backup sump pumps will become even more effective at protecting homes from water damage.
Conclusion: The Indispensable Role of Backup Sump Pumps
In conclusion, backup sump pumps are an indispensable component of home protection systems. They provide a critical safety net when primary sump pumps fail, ensuring continuous protection against water damage. By complementing primary pumps, offering various power options, and requiring proper installation and maintenance, backup sump pumps play a vital role in flood prevention. Homeowners who invest in high-quality backup sump pumps can enjoy peace of mind, knowing their homes are well-protected against the unpredictable forces of nature.
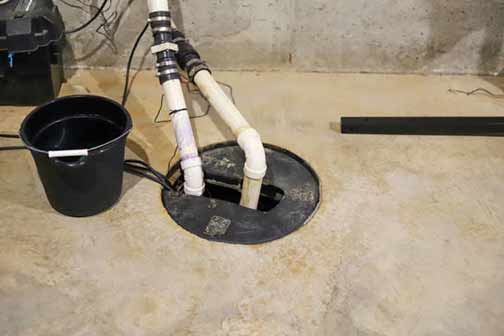
Sump and ejector pumps are critical components in preventing basement flooding. These pumps are designed to remove water that accumulates in a sump basin, typically found in the basements of homes. Ejector pumps, in particular, are used to manage wastewater from plumbing fixtures. Understanding the essential service practices for these pumps can help homeowners avoid the costly damages associated with basement flooding.
Understanding the Function of Sump Pumps
Sump pumps are installed in the lowest part of a basement or crawlspace. Their primary function is to keep the area under the building dry and prevent it from flooding. When water enters the sump basin through drains or by natural water migration through the soil, the sump pump activates and pumps the water out of the basin and away from the building. This process helps to keep the basement dry and free from water damage.
Key Components of a Sump Pump System
A sump pump system typically includes several key components:
Sump Basin: A pit where water collects before being pumped out.
Primary Sump Pump: The main pump that removes water from the basin.
Check Valve: Prevents water from flowing back into the sump basin.
Discharge Pipe: Carries water away from the home.
Battery Backup System: Ensures the pump operates during power outages.
Understanding the Function of Ejector Pumps
Ejector pumps, also known as sewage pumps, are used to handle wastewater from basement plumbing fixtures such as toilets, sinks, and washing machines. These pumps are essential for homes with plumbing fixtures located below the main sewer or septic line. Ejector pumps grind and pump wastewater up to the level of the main sewer line, ensuring proper drainage and preventing sewage backups.
Key Components of an Ejector Pump System
An ejector pump system includes several critical components:
Ejector Basin: A sealed pit where wastewater collects before being pumped out.
Ejector Pump: The main pump that grinds and pumps wastewater out of the basin.
Check Valve: Prevents wastewater from flowing back into the ejector basin.
Discharge Pipe: Carries wastewater to the main sewer or septic line.
Vent Pipe: Allows gases to escape from the ejector basin.
Importance of Regular Maintenance
Regular maintenance is crucial for ensuring the proper functioning of sump and ejector pumps. Without routine checks and maintenance, these pumps can fail, leading to basement flooding and costly repairs. Homeowners should schedule regular inspections and maintenance to keep their pumps in optimal condition.
Essential Maintenance Practices for Sump Pumps
To maintain a sump pump system, homeowners should follow these essential practices:
Test the Pump: Periodically test the pump by pouring water into the sump basin to ensure it activates and pumps water out properly.
Check the Power Source: Ensure the pump is connected to a reliable power source and that the power cord is in good condition.
Examine the Check Valve: Inspect the check valve to ensure it is functioning correctly and preventing backflow.
Clean the Discharge Pipe: Make sure the discharge pipe is clear of obstructions and directs water away from the home.
Maintain the Battery Backup System: Regularly check the battery backup system to ensure it is charged and ready to operate during power outages.
Professional plumbers have the knowledge and experience to diagnose and fix issues accurately.
Essential Maintenance Practices for Ejector Pumps
For ejector pump systems, homeowners should follow these maintenance practices:
Inspect the Ejector Basin: Regularly check the ejector basin for debris and clean it out to prevent clogs.
Test the Pump: Periodically test the pump by running water through the plumbing fixtures to ensure it activates and pumps wastewater out properly.
Check the Power Source: Ensure the pump is connected to a reliable power source and that the power cord is in good condition.
Examine the Check Valve: Inspect the check valve to ensure it is functioning correctly and preventing backflow.
Clean the Discharge Pipe: Make sure the discharge pipe is clear of obstructions and directs wastewater to the main sewer or septic line.
Maintain the Vent Pipe: Ensure the vent pipe is clear and allowing gases to escape from the ejector basin.
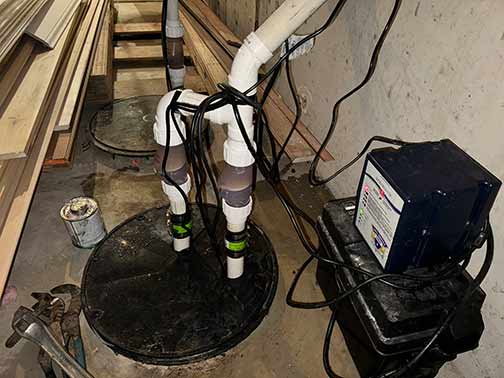
Importance of Installing Battery Backup Systems
Installing a battery backup system for sump pumps or ejector pumps is essential for ensuring their operation during power outages. Power outages can occur during severe storms, which is when the pumps are needed the most. A battery backup system provides peace of mind by ensuring the pumps continue to operate and prevent flooding even when the power is out.
Choosing the Right Battery Backup System
When selecting a battery backup system for sump and ejector pumps, homeowners should consider the following factors:
Battery Capacity: Choose a battery with sufficient capacity to run the pump for an extended period during power outages.
Compatibility: Ensure the battery backup system is compatible with the existing pump system.
Automatic Activation: Select a system that automatically activates when the power goes out.
Maintenance Requirements: Consider the maintenance needs of the battery backup system and choose one that is easy to maintain.
Warranty and Support: Look for a system with a good warranty and reliable customer support.
Professional Services for Sump and Ejector Pumps
While homeowners can perform basic maintenance on their sump and ejector pumps, professional services are recommended for more complex tasks and regular inspections. Professional plumbers have the expertise and tools to thoroughly inspect, maintain, and repair sump pump systems and ejector pump systems, ensuring they function efficiently and reliably.
Benefits of Hiring Professional Plumbers
Hiring professional plumbers for sump and ejector pump services offers several benefits:
Expertise: Professional plumbers have the knowledge and experience to diagnose and fix issues accurately.
Comprehensive Inspections: Professionals can perform thorough inspections to identify potential problems before they become major issues.
Proper Maintenance: Professionals can provide proper maintenance services, ensuring the pumps operate efficiently.
Peace of Mind: Hiring professionals gives homeowners peace of mind knowing their pump systems are in good hands.
Wrapping It Up
Preventing basement flooding requires a combination of regular maintenance, proper installation, and the use of battery backup systems for sump and ejector pumps. Homeowners should understand the essential service practices for these pumps and consider hiring professional plumbers for comprehensive inspections and maintenance. By taking these steps, homeowners can protect their basements from flooding and avoid costly repairs.
Maintaining your Chicago home’s sewer system is crucial for protecting your investment and ensuring the reliability of your plumbing infrastructure. A well-maintained sewer system prevents costly repairs, health hazards, and environmental damage.
Regular sewer system maintenance helps to avoid unexpected and expensive repairs. By keeping the system in good working condition, homeowners can prevent small issues from becoming major problems. Additionally, a properly functioning sewer system ensures that waste is effectively removed from your home, reducing the risk of health hazards such as exposure to harmful bacteria and viruses.
Environmental protection is another significant benefit of sewer system maintenance. Properly maintained systems reduce the likelihood of sewage leaks and spills, which can contaminate local water sources and harm wildlife. By taking care of your sewer system, you are contributing to a cleaner and healthier environment for your community.
Identifying Common Sewer System Issues in Chicago Homes
Before diving into maintenance tips, it’s important to recognize common sewer system issues that homeowners in Chicago might face. These include blockages, leaks, tree root intrusion, and pipe corrosion. Understanding these problems can help you take proactive measures to prevent them.
Blockages are a frequent issue in sewer systems and can be caused by a variety of factors, including the buildup of grease, hair, and other debris. Leaks can occur due to cracks or breaks in the pipes, often resulting from age or ground movement. Tree root intrusion is a common problem in Chicago, where roots can infiltrate sewer lines and cause blockages or damage. Pipe corrosion is another issue that can affect older homes, leading to weakened pipes and potential leaks.
Regular Inspections: A Key to Preventive Maintenance for Sewer Systems
Regular inspections are a cornerstone of effective sewer system maintenance. By scheduling annual or bi-annual inspections with a professional plumber, you can identify potential issues before they escalate. Inspections typically involve using specialized cameras to examine the interior of the sewer pipes, checking for blockages, cracks, and other signs of wear and tear.
During an inspection, a professional plumber can also assess the overall condition of your sewer system and recommend any necessary repairs or maintenance. This proactive approach helps to ensure that your sewer system remains in good working order and reduces the likelihood of unexpected problems.
Proper Waste Disposal Practices to Maintain Your Sewer System
One of the simplest yet most effective ways to maintain your sewer system is by practicing proper waste disposal. Avoid flushing non-biodegradable items, grease, and other harmful substances down the drain. Educate your household on what can and cannot be disposed of in the sewer system to prevent blockages and damage.
Common items that should never be flushed or poured down the drain include baby wipes, feminine hygiene products, paper towels, and cooking grease. These items can cause blockages and damage to your sewer system, leading to costly repairs. Instead, dispose of these items in the trash and use a grease container for cooking fats.
If you suspect tree root intrusion, contact a professional plumber who can use hydro jetting to remove the tree roots and repair any damage.
Addressing Tree Root Intrusion in Chicago Homes
Tree roots can cause significant damage to sewer pipes by infiltrating and blocking them. To prevent this, consider planting trees and shrubs away from your sewer lines. If you suspect tree root intrusion, contact a professional plumber who can use hydro jetting to remove the tree roots and repair any damage.
In addition to planting trees away from sewer lines, you can also use root barriers to prevent roots from reaching your pipes. These barriers are typically made of metal or plastic and are installed underground to create a physical barrier between the roots and the sewer lines. Regular inspections can also help to identify any potential root intrusion issues before they become major problems.
Using Enzyme-Based Cleaners for Sewer System Maintenance
Enzyme-based cleaners are a safe and effective way to maintain your sewer system. These cleaners use natural enzymes to break down organic matter, preventing build-up and blockages. Regular use of enzyme-based cleaners can keep your pipes clear without causing damage to the plumbing system.
Enzyme-based cleaners are an environmentally friendly option for maintaining your sewer system, as they do not contain harsh chemicals that can harm your pipes or the environment. To use these cleaners, simply follow the manufacturer’s instructions and apply them regularly to keep your sewer system in optimal condition.
Installing a Backflow Valve to Prevent Sewer Backups
In areas prone to heavy rainfall and flooding, installing a backflow valve can protect your home from sewer backups. This valve prevents sewage from flowing back into your home during periods of high water levels. Speak with a professional plumber to determine if a backflow valve is suitable for your property.
Backflow valves are particularly important for homes in low-lying areas or those with basements, as these locations are more susceptible to sewer backups. By installing a backflow valve, you can prevent costly damage to your home and reduce the risk of exposure to harmful sewage.
Maintaining Your Home’s Sump Pump for Effective Sewer System Function
If your Chicago home has a sump pump, regular maintenance is essential to ensure it functions properly. Check the pump periodically for debris and test it to make sure it activates and pumps water efficiently. A well-maintained sump pump can prevent basement flooding and sewer backups.
To maintain your sump pump, start by inspecting the pump and the surrounding area for any debris or obstructions. Clean the pump and the sump pit to ensure that water can flow freely. Test the pump by pouring water into the pit and observing whether the pump activates and removes the water efficiently. If you notice any issues, contact a professional plumber for assistance.
A well-maintained sump pump can prevent basement flooding and sewer backups.
Dealing with Sewer Line Leaks in Chicago Homes
Sewer line leaks can lead to serious damage if not addressed promptly. Signs of a leak include foul odors, slow drains, and unusually green patches of grass in your yard. If you suspect a leak, contact a professional plumber immediately to assess and repair the issue.
In addition to the visible signs of a leak, you may also notice an increase in your water bill or the presence of mold and mildew in your home. These issues can indicate a hidden leak that requires immediate attention. A professional plumber can use specialized equipment to locate and repair the leak, preventing further damage to your home and sewer system.
Implementing a Sewer Maintenance Schedule for Chicago Homes
Creating and following a sewer maintenance schedule can help you stay on top of necessary tasks and prevent issues from arising. Include regular inspections, enzyme-based cleaner applications, and sump pump checks in your schedule. Consistency is key to maintaining a reliable sewer system.
To create a maintenance schedule, start by listing all the tasks that need to be completed, such as inspections, cleaning, and testing your sump pump. Determine the frequency for each task and set reminders to ensure that you stay on track. By consistently following your maintenance schedule, you can keep your sewer system in optimal condition and avoid unexpected problems.
Understanding the Role of Professional Plumbers in Sewer System Maintenance
While some maintenance tasks can be handled by homeowners, others require the expertise of professional plumbers. Understanding when to call in a professional can save you time, money, and stress. Professional plumbers have the tools and knowledge to address complex issues and ensure your sewer system remains in optimal condition.
Professional plumbers can perform thorough inspections, identify and repair leaks, remove tree roots from sewer lines, and install backflow valves, among other tasks. By working with a professional, you can ensure that your sewer system is properly maintained and any issues are addressed promptly and effectively.
Cost-Effective Maintenance Strategies for Chicago Sewer Systems
Maintaining your sewer system doesn’t have to be expensive. By adopting cost-effective strategies, you can keep your system in good shape without breaking the bank. This includes regular inspections, proper waste disposal, and using enzyme-based cleaners. Investing in preventive measures can save you from costly repairs in the long run.
In addition to these strategies, consider performing some maintenance tasks yourself, such as cleaning your sump pump and applying enzyme-based cleaners. By taking a proactive approach to maintenance, you can reduce the need for expensive repairs and extend the lifespan of your sewer system.
By adopting cost-effective strategies, you can keep your system in good shape without breaking the bank.
Environmental Benefits of Sewer System Maintenance in Chicago
Proper sewer system maintenance not only protects your home but also benefits the environment. Preventing leaks and blockages reduces the risk of contaminating local water sources and minimizes the environmental impact of sewage spills. By maintaining your sewer system, you contribute to a healthier and cleaner community.
Maintaining your sewer system also helps to conserve water by preventing leaks and ensuring that your plumbing system operates efficiently. This can reduce your overall water usage and lower your utility bills, while also benefiting the environment.
Emergency Preparedness and Response for Sewer System Issues in Chicago
Despite your best efforts, sewer emergencies can still occur. Having a plan in place for emergency situations can minimize damage and stress. Know the location of your main sewer cleanout, keep emergency contact numbers handy, and educate your household on how to respond to sewer-related emergencies.
In the event of a sewer emergency, such as a backup or major leak, it is important to act quickly to minimize damage. Turn off the water supply to your home, if possible, and contact a professional plumber for assistance. Having a plan in place can help you to respond effectively and reduce the impact of the emergency on your home and family.
Investing in Sewer System Upgrades for Chicago Homes
As your home ages, investing in sewer line upgrades can improve reliability and efficiency. Upgrading old pipes, installing modern fixtures, and incorporating advanced technologies can extend the lifespan of your sewer system and enhance its performance. Consult with a professional plumber to explore upgrade options suitable for your home.
Some common upgrades for sewer systems include replacing old, corroded pipes with new, durable materials, installing energy-efficient fixtures, and incorporating smart technologies that can monitor and manage your plumbing system. These upgrades can help to improve the overall performance and reliability of your sewer system, while also reducing your environmental impact.
Conclusion: Protecting Your Investment Through Sewer System Maintenance
Maintaining your Chicago home’s sewer system is a critical aspect of homeownership. By following expert advice and implementing regular maintenance practices, you can protect your investment, ensure system reliability, and contribute to a healthier environment. Stay proactive, informed, and diligent in your efforts to keep your sewer system in optimal condition.
By taking a proactive approach to sewer system maintenance, you can avoid costly repairs, protect your home and family, and contribute to a cleaner and healthier community. Regular inspections, proper waste disposal, and investing in preventive measures are all key components of effective sewer system maintenance. Stay informed about local regulations and work with professional plumbers to ensure that your sewer system remains in good working order. By doing so, you can protect your investment and enjoy a reliable and efficient sewer system for years to come.